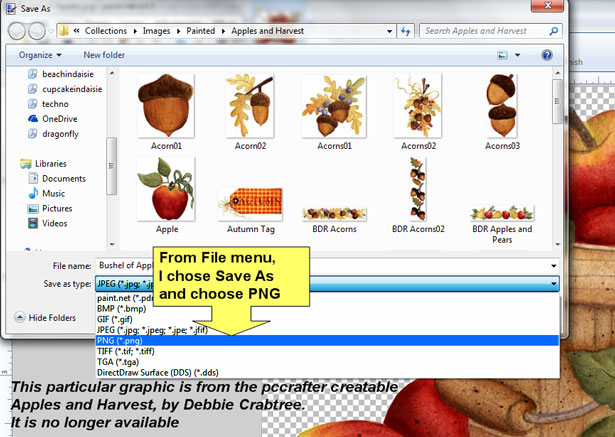
Cricut Explore Print
and Cut part 2
Note: I have made
a few updates to this page in 2019. There have
been many changes to Cricut Design Space since 2014
when I bought my Cricut Explore. The Print
then Cut feature now allows for a printable area
allowance size of 6.75 x 9.25 inches. And
instead of the 3 L brackets that are printed on the
image, now Design Space prints a black outline box
around the entire printed image.
That box is scanned in several areas first before the image is cut out.
But the basics of Uploading an image from a computer remain the same - and now you can also drag & drop an image directly from a folder or location on your computer to Cricut Design Space.
And you still choose your printer and print it out onto 8.5x11 Printable materials that your own Inkjet can print correctly on
are still the same.
Currently as of Oct 2019 I am using the Desktop version of Cricut Design Space on my Windows Computer :
Desktop (Beta) version of Cricut Design Space for Computer users FAQ :
https://help.cricut.com/hc/en-us/articles/360020790073-Design-Space-for-Desktop-Beta-FAQ
original 2014 page with a few updates:
I wanted to show a bit more of just how well I have found my new Cricut Explore to cut out my own(ed) digital clip art graphics
I cut out a few images that had some very fine details and tiny areas to cut.
For the most part the Explore did an excellent job.
Some of the thinnest and smallest of parts did not fair well, but the Explore did far better than I ever expected.
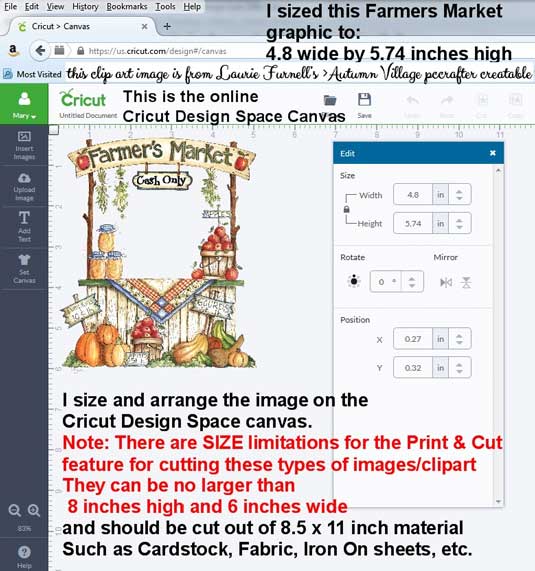
In the Screen Shots and photos below, the graphic I am using is one from a PC Crafter.com Creatable
"Autumn Village" by Laurie Furnell,
as I mentioned in my previous web page > Print and Cut with the Cricut Explore all owners of the Cricut Explore, must use the Online web program
Cricut Design Space. Most of the complaints I have read so far, since the Cricut Explore was released in Spring 2014, is the fact that you must be online/on the internet, to accomplish all of your creating (except for the printing using your own printer, and the cutting using the Cricut Explore).
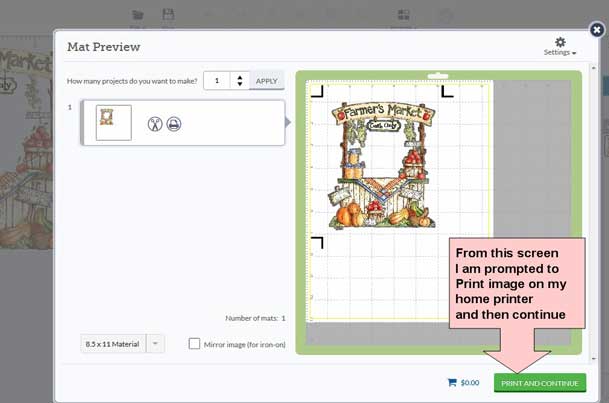
The Cricut Design Space software places all of the registration marks on the images, that you have on the workspace canvas of the Design Space.
When you press GO, you will be prompted to Print the image(s) you have on your Canvas via your own printer.
And it's important to note that there are Size limitations of the Print and Cut feature - images can be no larger than 6 inches wide and 8 inches tall (that's all I've done so far with the machine is cut out from my own stash of clip art) . So if you will be wanting to print and cut clip art images larger than that from an 8.5 by 11 inch sized material, you will be out of luck.
There may be work arounds or fixes to this sizing limitation in the future or that others have found to work for them.
I upload the image and insert on to my Design Space canvas (online) and sized the graphic
I sized the graphic within the range of limitations
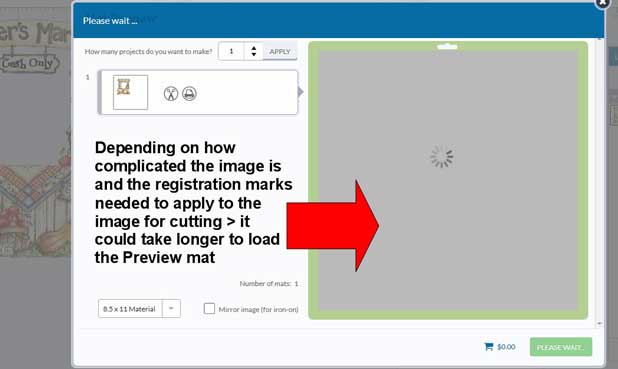
After pressing the GO button/icon, the screen with a Mat preview and prompts to Print the image comes up>
since this particular image has to set up quite a bit of cutting & registration marks, it took longer to show the Preview
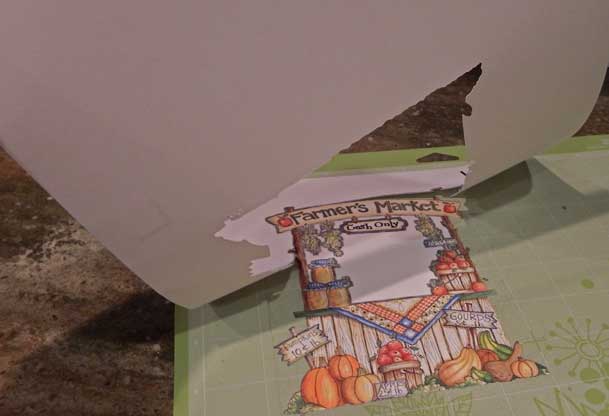
Once the mat preview shows, I can Print the image via my home printer (I printed this image on cardstock)
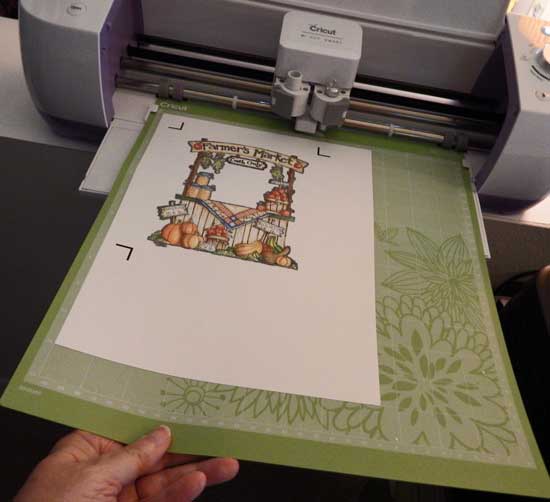
After printing, I placed the cardstock on the sticky mat for the Cricut Explore and loaded it to the Machine
***I uploaded a 3 minute video to YouTube of the "Cutting Action" that you are welcome to view***
Cricut Explore cutting out the Farmer's Market graphic
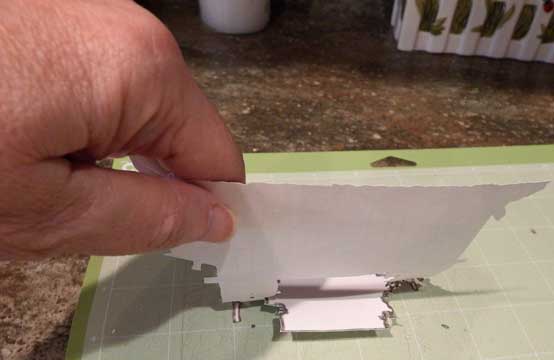
Once cut, I remove the image from the mat
and
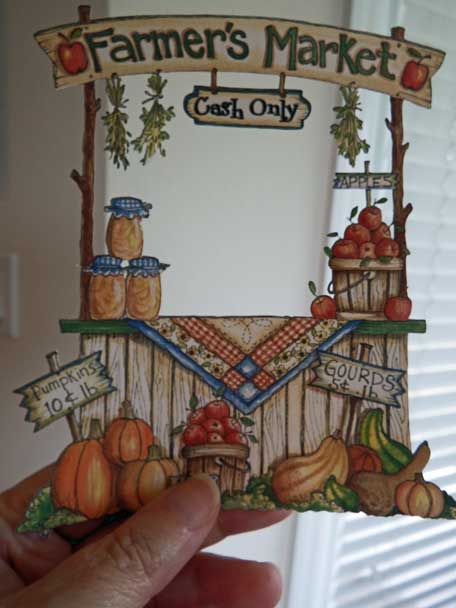
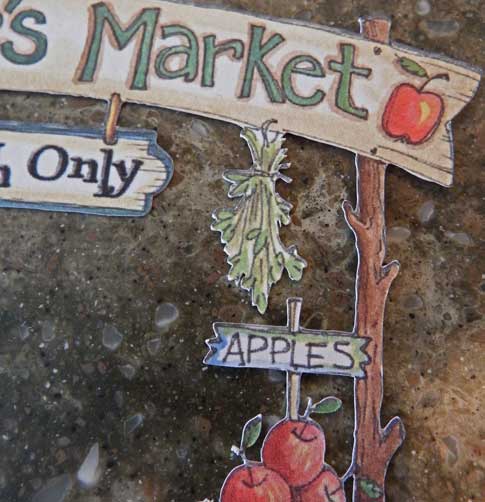
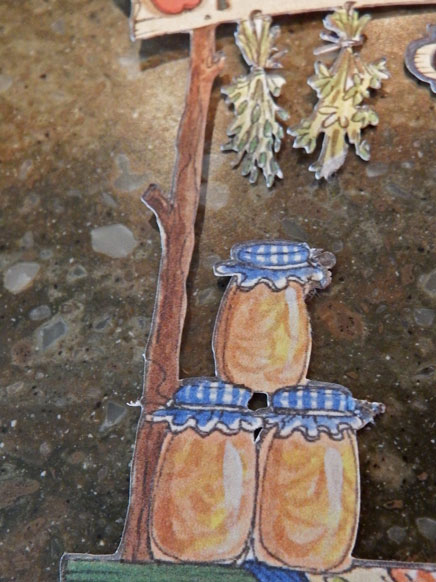
Taa-Daa - look at how it cut around those tiny leaves on the apples
and in between the stacked jars
***note: on the graphic the words "Cash Only" were applied using
my Microsoft Digital Image photo/graphic editing software program.
I usually prepare images
before I upload to Cricut Design Space, so if I want text added
or want to make any adjustments to a particular graphic(s),
I will do that BEFORE I upload the image to the online Cricut Design Space.
I made a folder on my computer that I put any graphics that I may
want to use the Print and Cut feature of the Cricut Explore machine.
Some closeups:
Pretty darn good, don't ya think ;)
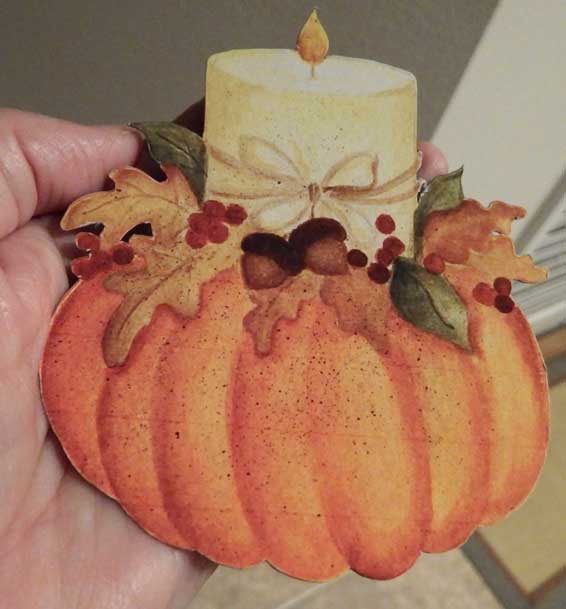
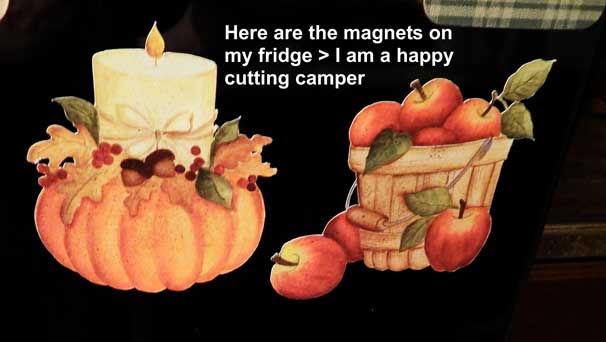
Here are some other things I've printed and cut with the Explore
these were printed on Avery inkjet printable Magnet Sheets
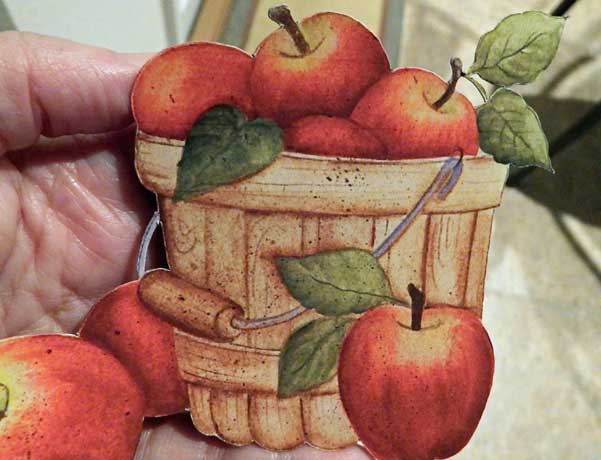
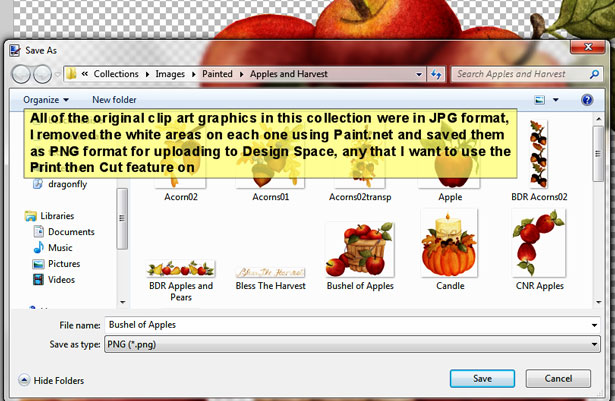
**Image credits: pccrafter creatable> Apples and Harvest by Debbie Crabtree (no longer available for sale)
and
Note: many of the clip art images I have from pccrafter were in JPG format (all collections prior to June 1, 2006 had only the JPG, and WMF formats for each of their Creatables).
PNG formatted clipart collections were only released after June 1, 2006 (you had the ability to download each format - The JPG or PNG for any collections released after June 1, 2006, but some gals only downloaded the JPGs because the PNG file was too large for older software or computers to handle well, and many used the feature of the payfor deluxe hugbug browser to remove the white from surrounding their jpg graphics, with holding down their computers Shift key and dragging and dropping over to their favorite graphic/photo editing program.
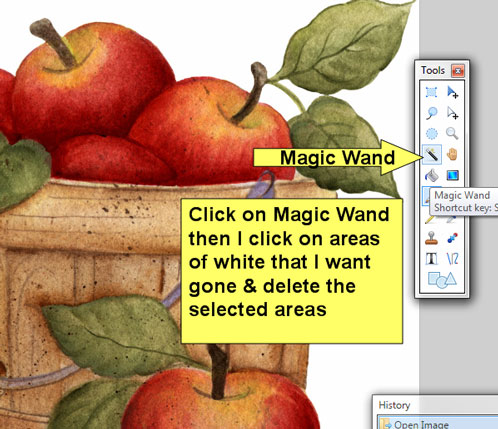
Only problem with this way of removing white, is that it would remove any white inside the graphic itself that matched the white pixels that surrounded it. So doing that wasn't good for graphics with lots of white, such as snowmen etc. I prefer to use the Magic Wand selection tool available in the software programs I have on my computer, such as Microsoft's Digital Image - which is my favorite program to use.
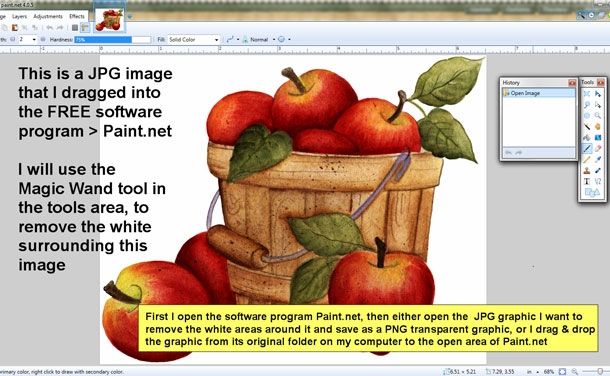
But there is a FREE program Paint.net, that also has a magic wand tool, that I often use just for quickly removing the white around JPG graphics and saving them in PNG format, and upload only those PNG images to Design Space to use for the Print then Cut feature.
Here are some screen shots, showing using Paint.net to remove the white around the Bushel of Apples graphic that I printed on Avery magnet paper, and cut with the Explore. **Note I removed the white areas on each of the graphics/ clip art images in the Apples & Harvest pccrafter creatable.
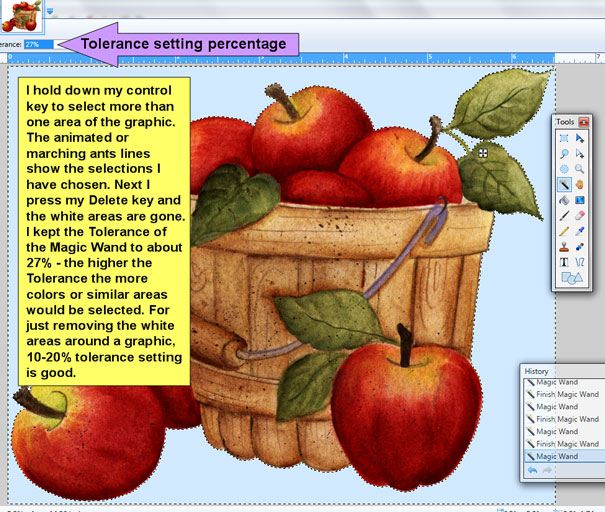
after areas are selected, use your delete key, and remove the white areas
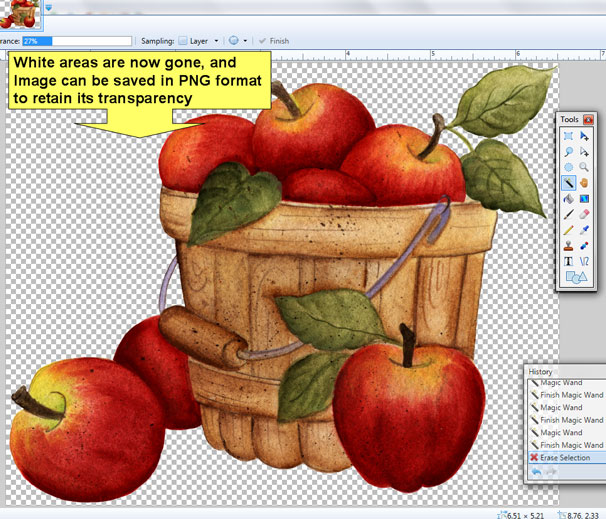
now that white areas are gone, Use File menu, and choose Save As, and save as a PNG image format
to retain transparency. Use the PNG image to upload to Design Space
I took all the images in this particular collection and made them all PNGs (using Paint.net) - I kept the PNG and original JPG images in the same folder. I only upload the PNG formatted ones to Design Space, if I want to use the Print then Cut option
Note: I have only used the free program Paint.net for removing the white around JPG graphics,
as I find it does an excellent job - especially on fine details, but most times I do prefer, using Microsoft's discontinued program Digital Image Suite 2006 for doing my work on graphics/clip art.
Download for Free > Paint.net
find >>Tutorials
**Scroll down this page to see the Snowman Magnets I made**
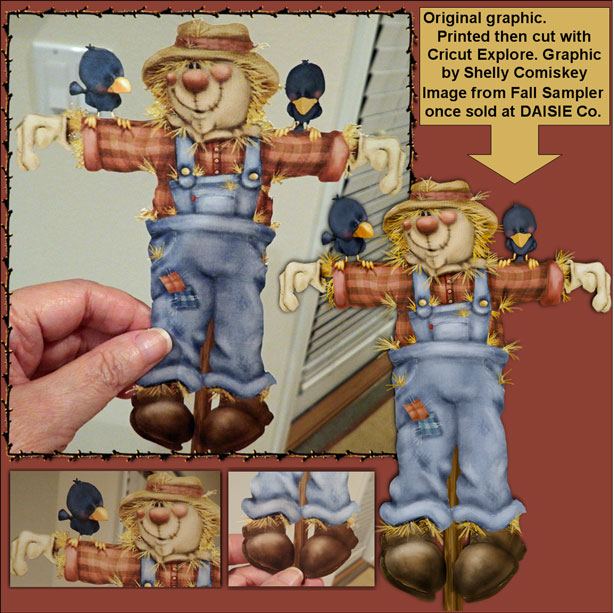
I also cut a Scarecrow graphic (on cardstock) from a Shelly Comiskey set "Fall Sampler"
that was once sold
at Daisie Company (Update : Daisie Co. closed in July 2019 ) Shelly no longer sells digital clipart sets online.
This image of PEACE is by Laurie Furnell from her former pccrafter creatable
A Christmas Sampler 2 (no longer available) Find Laurie's current clip art offerings
at or at her Etsy Shop
You can try contacting Laurie via her Etsy shop, to ask if she might make available
for sale other past pccrafter collections that are not currently offered at Aimee Asher or her Etsy store.
She has control of her entire catalog of past pccrafter clip art sets.
Note: I have on my Blog, links to listings of past pccrafter collections in Excel and PDF formats
where you can see a listing in alpha order by collection name and names of the artists of each collection >> see my blog post from 2013
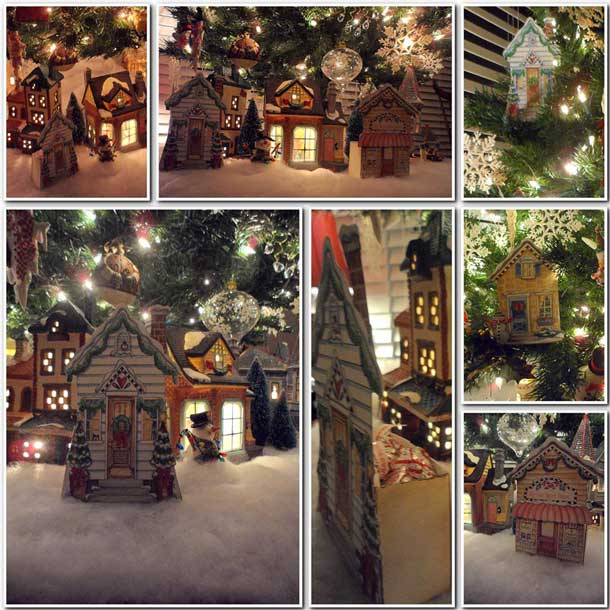
I also took a box by Laurie Furnell,, that had a snowman on it, and using my software program Microsoft Digital Image,
I removed the snowman and replaced it with one of her Village Houses from her pccrafter creatable "Christmas Village"
(no longer available)
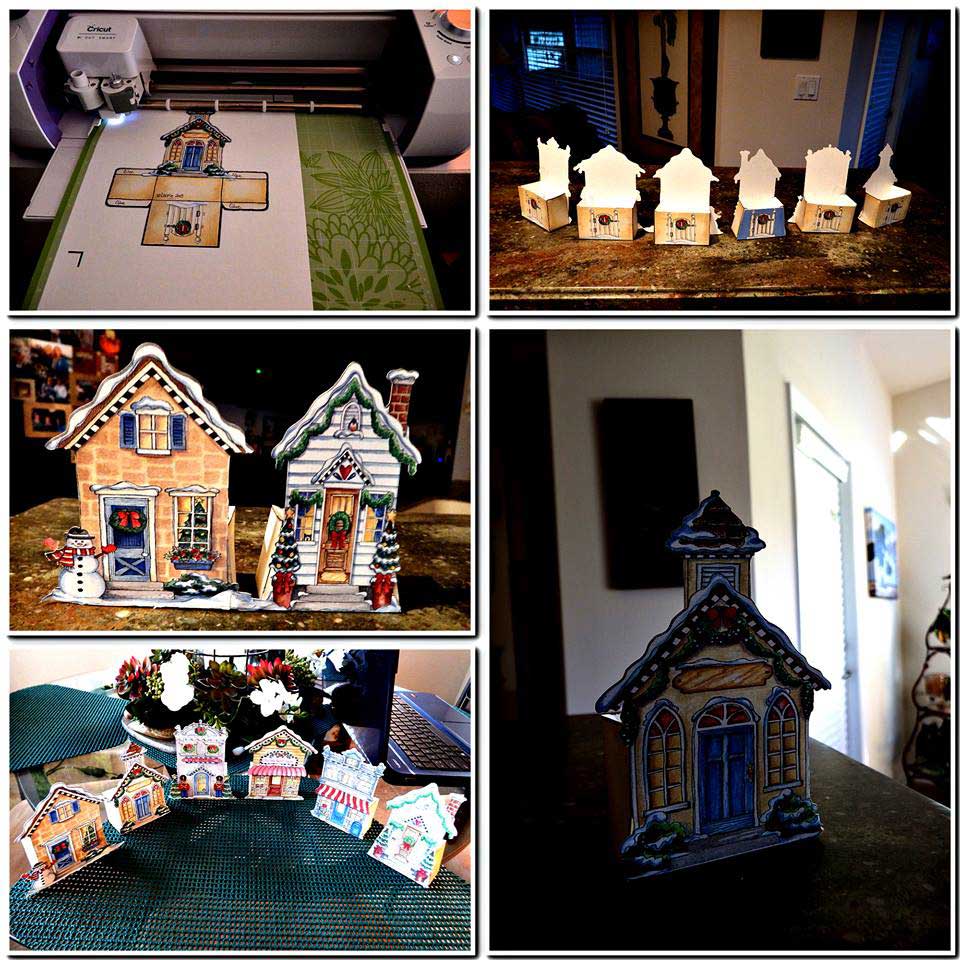
I made boxes from most of the House/Village clip art images. I had made these up a couple of years ago, and printed out in a larger size (and cut by hand with scissors),
Seen below >>
these particular Christmas village house boxes were printed to fill out a full
8.5x11 sheet of cardstock and cut by hand.
So I had saved these boxes' image files, and just uploaded them to Cricut Design Space,
And with the size restrictions in Cricut Design Space, I had to fit these favor boxes, within the 6inch wide by 8inch high area and they made up nicely as small favor boxes I can fill with m&m's. I printed them out and then cut them with the Explore, and scored and folded them myself. Seemed like more work for me to figure out - how to add score lines to the small boxes and use the Score Stylus that I got with my purchase of the Cricut Explore from HSN
Here's a couple of collages of how they turned out. I had saved each box in PNG format and
uploaded to Design Space, and used the Print then Cut option for each box.
the snowman box in upper left, is the box I used and
swapped out the snowman for the various houses.
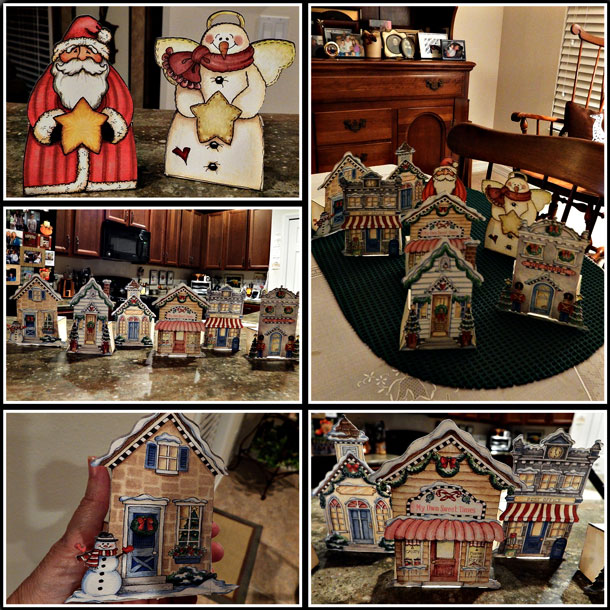
The box is in Laurie Furnell's CD Collection
"Heart & Soul" (no longer available)
*The Santa box is from Laurie's pccrafter creatable, "Santa", which is no longer available.
(You can try contacting Laurie via her Etsy store, to ask if
she might ever upload and offer more of her past pccrafter collections such as
Christmas Village, Santa or her images on the HugWare CD Heart & Soul which was a very popular
collection of images) Laurie's Etsy Store >> https://www.etsy.com/shop/lauriefurnelldesigns
**I also used these same village houses in another project I did with my granddaughter in 2008
where she used her Crayola cutter (I don't know if that is still sold)
http://sippingtea.com/hugbees/furnellvillage.html
Note: I have on my Blog, links to listings of past pccrafter collections in Excel and PDF formats
where you can see a listing in alpha order by collection name and naming the artists of each collection >> see my blog post from 2013
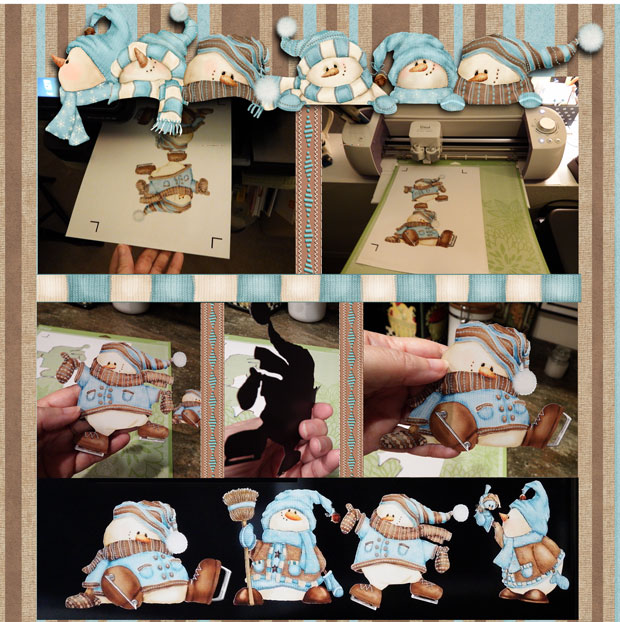
>>>>I did another set of Magnets, using the Avery brand of Magnet Sheets,
I set my Cricut Explore dial to Cardstock, the magnet sheets are not very thick. My printer (an HP Photosmart 7510) and the Explore handle the sheets well.
I used images from Shelly Comiskey's "Frosty Friends" collection that was once upon a time sold at Daisie Company (note in June 2019 Daisie Co. closed) . Shelly no longer sells her art in downloadable clip art form.
I am so glad I bought just about every set she ever offered on pccrafter.com and daisiecompany.com.
Because I know that the print area for anything using the Print and Cut option of the Cricut Explore is limited
to 6 inches wide & 8 inches high, I prefer to prepare all of my images before uploading to Cricut Design Space.
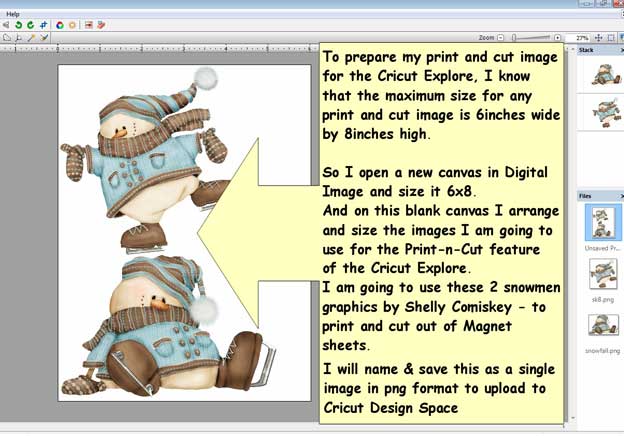
I use the discontinued software program > Microsoft Digital Image Suite 2006, to work with my graphics collections
and also photos. I open a new document/canvas in Digital Image and size it to 6 by 8 inches. Then I bring in my graphics, and I arrange them within that canvas. Sometimes I may put one of more graphics within that space, or
limit to just one graphic.
For the magnets of the snowmen, I placed 2 images on the 6x8 canvas. I then named and saved this compilation
in PNG format. I try to only upload images in PNG / transparent format, but if needed, I can use the magic wand tool that is available to clean any images that are uploaded to Design Space which usually has to be done for JPG format
images. I clean or remove the white background from any JPG images using the Magic Wand tool in Digital Image.
Another program that I like for removing the white background on JPG images is the Free program Paint.net (not to be confused with the program PAINT that comes with most Windows operating system computers)
If I remove the white background around a JPG graphic using either Digital Image or Paint.net - I save that image in PNG format to retain its transparency.
I name and save images that I will want to cut using the Cricut Explore
to a folder that I created on my computer, named Clipart2CutwCricut.
And I created some subfolders within
that one main folder, named for the Artist and the Name of a specific collection by the artist.
Doing that, helps keep me a bit more organized and focused, as I don't want to spend time looking
for a particular image that I want to upload to Design Space. I personally own 100's of graphics/clip art images.
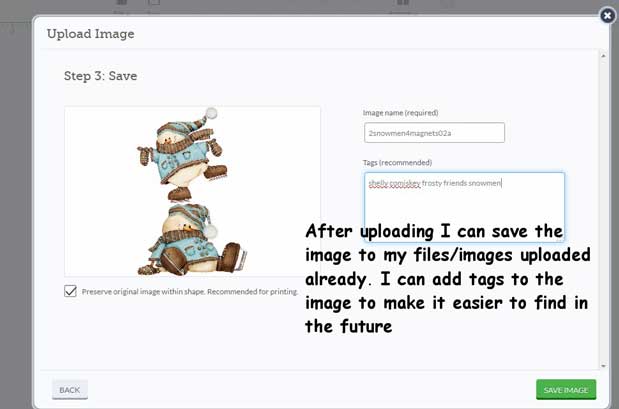
Here are some screen shots that show some of the steps I took or did for making the snowman magnets:
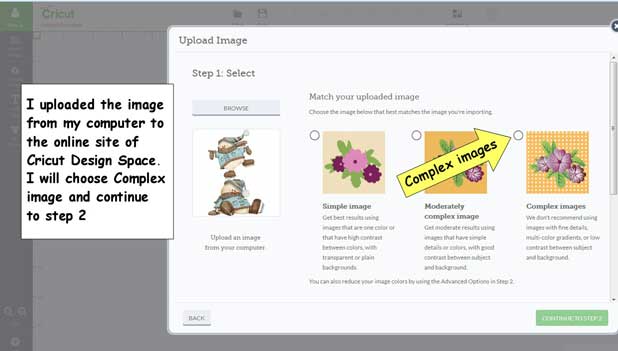
Upload image to Design Space online
I enter keywords for this graphic for future reference and save the image
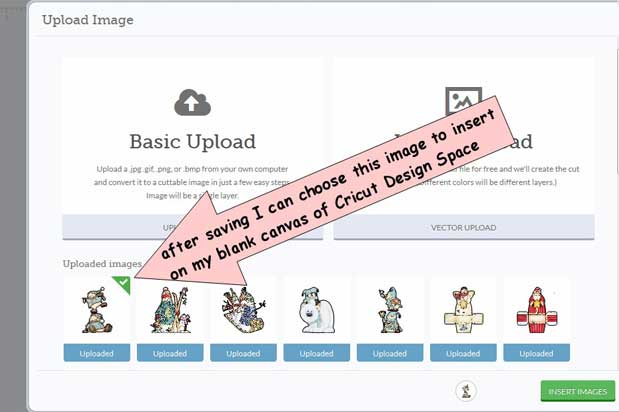
Choose and Insert the Image onto the Cricut Design Space canvas.
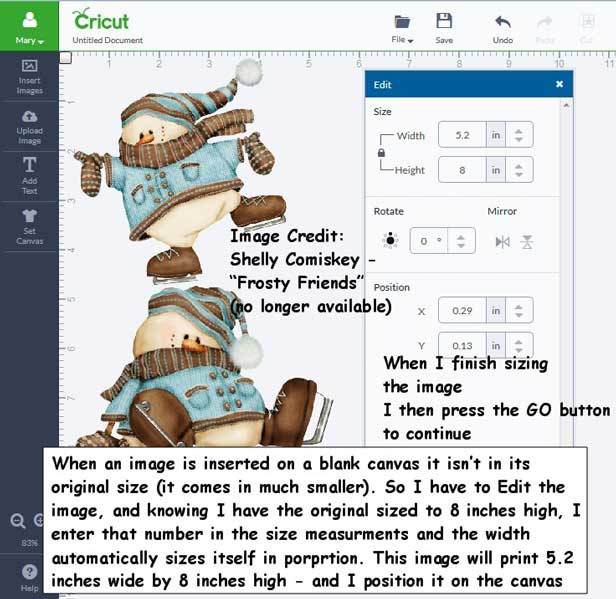
Once the image is placed on the Design Space canvas, it will come in much smaller than
the original. So I use the Edit button and enter the max height for the Print and Cut of 8 inches
**The same as I had designed the compilation in MS Digital Image software program.
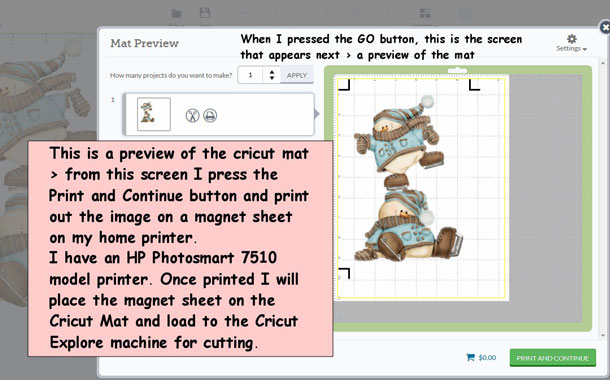
Then I can Print this image out on my home printer and place it on the cricut mat
and load to the Cricut Explore machine for cutting. I did place small pieces of
scotch tape to the adhere the magnet sheet to the Cricut Mat - just to be sure it stayed in place.
Here is a layout made with photos of this project. The four at the bottom of the layout are how they appear
on my black refrigerator. Here's >> a link to a youtube video showing
the cutting of the magnets on the Explore - or view video found below this layout.
Update 2019 : In 2015 I purchased a HP Envy 7640 printer and I subscribe to the HP Instant Ink program.
Graphics elements used on this digital layout
are also from the same Frosty Friends collection.
Back to >>> my first page with info about the Cricut Explore and how I used the machine to cut clip art from my owned stash of images
See Page 3 > more of my experience with the Print & Cut feature of the Cricut Explore
Note: I have made a few updates to this page in 2019. There have been many changes to Cricut Design Space since 2014 when I bought my Cricut Explore. The Print then Cut feature now allows for a printable area allowance size of 6.75 x 9.25 inches. And instead of the 3 L brackets that are printed on the image, now Design Space prints a black outline box around the entire printed image. That box is scanned in several areas first before the image is cut out.