My own screenshots showing How I used the Print then Cut feature
Cricut Explore FAQs
Facebook Groups for Explore Owners
Other links of Interest
See Page 2 > more of my experience with the Print & Cut feature of the Cricut Explore
See Page 3 > more of my experience with the Print & Cut feature of the Cricut Explore
new page created March 2015, Making Cards using features of my offline
software programs and cutting with my Cricut Explore
http://sippingtea.com/tuts/cardscutwithcricutexplore.html
New page created 2016 >> How I Printed and Cut elements/images from a Digital Scrapbook Kit
http://sippingtea.com/tuts/printncutdigielements.html
New page April 2017 >> How I made a set of Placecards
Design Space 3 was finally released in Spring 2017. The Print then Cut printable area allowance is
6.75 x 9.25 inches in ALL Internet Browsers
2019 Jan 8th newer updates to Design Space and more updates are due in the future.
The option to Print then Cut is now in top portion of tool bar and you choose Fill for Print (and then have the option
of using a color or filling a shape with a pattern) You can still upload and fill shapes for using in
Print then Cut projects.
Here is information about the Update to Design Space that occurred on Jan 8th 2019 ---> Important Changes to Design Space!
January 8th, 2019 • Contributor: Stephanie Gramann, Cricut Software Product Manager inspiration.cricut.com/linetype-fill-design-space/ and here is link to the Design Space Help page on Cricut - check out the Canvas Overview of Design Space ----> help.cricut.com/hc/en-us/sections/360001958093-How-To .
This is link to Melody's video about the changes ---> New Design Space Line Type & More Just Released! Cricut Update! Melody Lane / Published on Jan 8, 2019 : www.youtube.com/watch?v=bR4MgRhsS1c&t=76s
The Changes to Design Space on Jan 8th 2019 may make watching videos made prior to Jan 8th confusing. Just as watching videos prior to the change from Design Space 2 to Design Space 3 in July 2017 makes watching videos made showing usage of Design Space 2 confusing to watch compared to the now current versions of Design Space. It's important to remember that Design Space will always be an evolving software program. And yes that can be frustrating when trying to learn the program and watching outdated videos to learn by.
Here is a link to the page that tells about recent and past feature additions to Design Space 3 for Computer Users >> help.cricut.com/hc/en-us/articles/360009555433-Release-Notes-Design-Space-Windows-Mac-
Release Notes: Design Space (Windows/Mac)
January 8, 2019
Same features. New location!
• From now on, change Linetype (Cut, Draw, and Score) and Fill (Print Then Cut) of an object from the Edit toolbar.
• Change the Linetype of multiple objects with a new multi-select feature!
• Image, font, and cartridge (image set) information can be found by right-clicking on the Layers panel.
help.cricut.com/hc/en-us/articles/360015311334-Release-Notes-2019-01-08
Every Saturday morning at 11am eastern time, Melody Lane hosts a Learn Design Space features class. The video is recorded to watch at anytime but if you watch live you can ask questions of Melody.
Subscribe to her Youtube channel and click on Notifications so you will be notified of new videos she posts >> www.youtube.com/user/MelodyLane815/videos
Sign up for her emails bit.ly/emailfromMelody
Note: I have made a few updates to this page in 2019. There have been many changes to Cricut Design Space since 2014 when I bought my Cricut Explore. The Print then Cut feature now allows for a printable area allowance size of 6.75 x 9.25 inches. And instead of the 3 L brackets that are printed on the image, now Design Space prints a black outline box around the entire printed image.
That box is scanned in several areas first before the image is cut out.
But the basics of Uploading an image from a computer remain the same - and now you can also drag & drop an image directly from a folder or location on your computer to Cricut Design Space.
And you still choose your printer and print it out onto 8.5x11 Printable materials that your own Inkjet can print correctly on
are still the same.
Currently as of Oct 2019 I am using the Desktop version of Cricut Design Space on my Windows Computer :
Desktop (Beta) version of Cricut Design Space for Computer users FAQ :
https://help.cricut.com/hc/en-us/articles/360020790073-Design-Space-for-Desktop-Beta-FAQ
NOTES
Printers I own and use for my Print then Cut projects:
HP Photosmart 7510 - this is an older model that I had when I bought my Explore in Oct. 2014
and my newer machine that I currently use
HP Envy 7640 - - I got mine from HSN in late 2015,
and I participate in the HP Instant Ink program that the Printer qualifies for.
I use white Neenah Index 110lb white cardstock for most of my print then cut cardstock images
For sticker paper I use Avery - white full sheet label paper, or
a glossy photo type full sheet sticker paper I found on Amazon
LD Photo Glossy Finish Sticker Sheets
For stickers, I use the Custom setting of Sticky Note on the Explore custom dial setting
For printing on Magnet sheets I use the
Avery brand of Printable Magnet sheets in my printer
(usually only one or sheet at a time in my printer tray with a few sheets of copy paper beneath it)
I put the setting at poster board on the dial for magnet sheets.
For Printable Vinyl which is used like a Sticker : I can use the Cricut Brand of Printable Vinyl
I can also print out onto the Cricut Brand of Transparent / Clear sticker sheets.
But I can NOT use in my HP Printers the Cricut Brand of white sticker sheets, it is too thick to feed
properly though my HP printers.
For Printable Iron On Transfer Sheets, I can use Jolee's Iron On Transfer Sheets for Dark fabrics.
I feel my printer prints a more vibrant image using the one for darks and I don't have to mirror the image.
I have also have used the Product from Expressions Vinyl,
that they refer to as Printable HTV, but it is just like other Iron On Transfer sheets used in an Inkjet Printer.
And Starcraft printable inkjet transfers sheets
are available on 651vinyl.com and other sources that sell the Starcraft brand online.
DO NOT TRY TO PRINT ONTO REGULAR VINYL. Make sure what ever you are Printing onto
is designed and noted to be usable in an Inkjet or Laser printer. Cricut recommends the
use of an Inkjet Printer and to use White 8.5x11 Printable materials.
Note the Cricut Maker introduced in Aug 2017, can use in the Print then Cut feature
light color or light patterned, printable 8.5x11 materials, as it has a more powerful
scanner to detect the black registration box that is printed around the image(s)
NOW back to my original post from 2014
*NOTE: many of the links here were gathered and posted on this page in Oct 2014.
There have been improvements and enhancements to Design Space since that time
and many new articles and youtube videos
can be found online showing the how-to's etc. for using Design Space
and opinions and comparisons for the Cricut Explore line of machines.
Note too, that my screen shots on these pages
are from the version of Design Space that was available in Oct 2014.
The process of using the Print then Cut feature is still using the same
or similar steps that I show on this page, only the Design Space screens
may be different in the current (2019) version of Design Space.
Update: at some point in 2017 a new version of Design Space will be released
Design Space 3, that version will NOT rely on using the
Adobe Flash Plugin and will have other feature additions and improvements.
Changes were made to Design Space in January 2019 as well
The basics of the Print then Cut feature >> youtube video by Lorrie Nunemaker published July 2017
www.youtube.com/watch?v=eL6kE4TjupA
**Note there are changes to the editing canvas area of Design Space that occurred on Jan 8th 2019 :
Here is information about the Update to Design Space that occurred on Jan 8th 2019 --->
Important Changes to Design Space!
January 8th, 2019 •
inspiration.cricut.com/linetype-fill-design-space/
and here is link to the Design Space Help page on Cricut - c
heck out the Canvas Overview of Design Space ---->
help.cricut.com/hc/en-us/sections/360001958093-How-To .
In August 2019 - a newer version for Computer users was released
the Desktop (in Beta mode as of Oct 2019)
version of Cricut Design Space
https://help.cricut.com/hc/en-us/articles/360020790073-Design-Space-for-Desktop-Beta-FAQ
Bluetooth built in model the Cricut Explore "Air"
released first in Feb 2015
and a single carriage
model the Explore ONE released in Spring 2015
and
the Cricut Explore Air *2* released Oct 2016
visit Cricut.com for all "current" model information
the model that I own is no longer made or sold by Cricut
but it can do everything any other Cricut can do, except for
cut faster on some materials or write faster, that is a feature offered
on the new machine the Cricut Explore Air*2* model which has
a Fast Mode option.
What are the Differences in the Cricut Explore models
http://help.cricut.com/help/cricut-explore-difference
The Cricut Maker was introduced in Aug 2017
See the Machine Comparisons
https://help.cricut.com/hc/en-us/articles/360009505193-Cricut-Machines-Comparison
My own review and personal experience with the New Cricut Explore™ cutting machine
I bought the Cricut Explore in October of 2014 when it was the Special of the Day on HSN.com. I paid $249.00 (plus sales tax, shipping was free)
The machine came with some extras that made it a better value than if I had bought it at other online sources.
Plus I liked that buying it via HSN, I had until Jan 31st 2015 to return it. So that would give me lots of time to test out its features.
I was mainly interested in cutting out my own vast stash of Clip-art via the print and cut feature that is offered on this machine.
So this review and experience will focus on just that feature.
But first some background history for my fellow Hugsisters from PC Crafter.
Once upon a time, I belonged to a community message board on the former pccrafter.com website. PC Crafter sold the most wonderful downloadable Clip Art sets, done by some of the most talented artists around. Laurie Furnell, Carolee Jones, Tammy DeYoung, Debbie Mumm, Carolyn Shores Wright, Shelly Comiskey, Gina Jane (Johnson), Tricia Santry and many more, who created 30 piece sets, called "Creatables". The motto for pccrafter was "We put the ART in Clip Art" - and they did.
I bought hundreds of dollars worth of clip art sets over the years 2002 to 2010. The website stopped producing new clipart sets at the end of 2010 and closed its doors to selling clip art and shut down its message board by 2012.
Around 2006 to 2008 there were discussions on the message board about new software programs made by Sure Cuts A Lot and Make the Cut, that when used with the Cricut Expression machine (which used Cartridges with images on them that you could cut using the Cricut machine) - you could bypass the use of the Cartridges and following some steps, open your "Clip Art" images within the software and then print out on your computer and then get the Cricut Expression to cut that image out.
Now anyone who had bought a Cricut Expression during that time was thrilled with this prospect. And the makers of those software programs touted the fact that you didn't need to buy those "expensive" cartridges anymore, you could print and cut out your "very own" images. And so the message boards and the message boards over at Cricut buzzed with excitment over this. But of course Cricut (whose life blood was selling the Cartridges) wasn't happy about all this talking going on. So eventually they began a lawsuit against Sure Cuts A Lot and Make the Cut. Both companies agreed to stop promoting their software, used on a Cricut Expression, and said they would remove that feature for the Cricut Expression from their software.
Both Sure Cuts A Lot (SCAL) and Make the Cut (MTC) - still make their software, but they support other Cutting Machines on the Market , such as the Silhouette Cameo, and others. But the software no longer works with new Cricut Expressions. (You can design using MTC or SCAL, and save things in the SVG format and upload those svgs to Cricut Design Space and cut with your Explore.)
In early 2014 - Cricut made the announcement of a new machine, The Cricut Explore. Now the machine previous to this one, was the Cricut Imagine. The Imagine was a machine that partnered Cricut with Hewlett Packard. You were supposed to be able to use all of your Cricut Cartridges and ones designed just for the Imagine, and be able to design and change colors, etc etc right on the machine. Then the Imagine would print and cut all in one step. The Imagine had its issues and critics right from the beginning, and wasn't very successful in the marketplace. So Cricut "FINALLY" went back to the drawing board, and FINALLY listened to all those voices - that said - We WANT TO CUT OUR OWN DESIGNS and CLIP ART just like other cutting machines can do - the Silhouette CD and Silhouette Cameo, KNK Zing, Boss Cut Gazelle, etc.
Over the years, Cricut has been bashed online for poor customer service, for machines that didn't work as advertised. and about its handling of the Make The Cut and Sure Cuts A Lot manufacturers. All crafters wanted was for Cricut to figure out what other cutting machines and software makers had already. The having to buy Cartridges, which were usually $20 and UP!!, was irritating to Cricut owners, making owning their machines expensive and totally "Cartridge" based. Many Cricut owners love their machines, and don't mind buying and using Cartridges. My daughter has a Cricut Expression and has enjoyed using and creating projects with it. She owns several cartridges.
Well, I watched the launch of the Cricut Explore back in March of 2014 on HSN.com , and they briefly touched on the new feature of Print and Cut - BUT, that feature was not available YET, maybe by Fall!! So close and yet so far, LOL. I waited until it was offered again in Oct 2014, and with the ability to return in Jan 2015, and 5 easy payments, I took the plunge to purchase this machine, and take it for a test "print and cut" run. And I wanted to know how easy using the online Cricut Design Space was for doing all of this (you may have to register on the Cricut website to sample or use the Cricut Design Space). Cricut Design Space is a Free online work canvas that you can assemble your projects on.
For info on Design Spage see> Cricut Design Space Reference Guide & Glossary
OK - so I get the machine, and found it easy to set up, I also watched this > You Tube video, which shows basically what I did >
(the gal in video also bought her machine from HSN **note this is a video from spring 2014)
See this Kens Kreations 2015 youtube showing Unboxing and Setting up a Cricut Explore Air https://www.youtube.com/watch?v=kDtsqZMrl4k
and from Cricut.com > http://us.cricut.com/home/support/faq%27s
Unbox, Set up and First Cut
https://www.youtube.com/watch?v=OqnlWf9_5Cc
See this Kens Kreations 2015 youtube showing Unboxing and Setting up a Cricut Explore Air https://www.youtube.com/watch?v=kDtsqZMrl4k
What I did was first go for cutting an image from my Clip Art stash as my first project - I still had to follow all the steps for getting the machine set up, and calibrate it for cutting (Note: the Cricut Explore AIR model does not or shouldn't require Calibrating the Machine to use the Print then Cut feature). Those steps weren't that hard, I just followed the Prompts on my Computer Screen. All in All the set up was fairly easy. I did watch videos on You Tube to help me, but once I got into the actual steps > Open a New Project, Upload an Image from my computer, press GO, follow the prompts to Print the image using my own Printer, then insert the printout into my Cricut Explore, load, and Cut >> that was all it took. I was a Happy Camper. I didn't really have to learn any software programs, the steps to follow were pretty straight forward. All I wanted to accomplish was the cutting out of a clip art image. **I currently own 2 HP printers and am very happy with the quality of my printed images, I own an older HP Photosmart 7510, and a newer HP Envy 7640 model - that I also have subscribed to the instant ink program available for that model See information on the HP instant ink program and the models eligible at > http://store.hp.com/webapp/wcs/stores/servlet/ContentView?storeId=10151&eSpotName=InstantInk&catalogId=10051&langId=-1 or http://support.hp.com/us-en/document/c03760650 . All of my images are at least 300 dpi, and uploaded as PNG image format, to cut with the Explore.
Here are some screen shots with notes, and photos of my very first attempt(s)
1. I opened Cricut's Design Space webpage and logged in with my email and password
Then chose > Create New Project which takes me to a new Canvas.
**Note: For info on Design Spage see> Cricut Design Space Reference Guide & Glossary
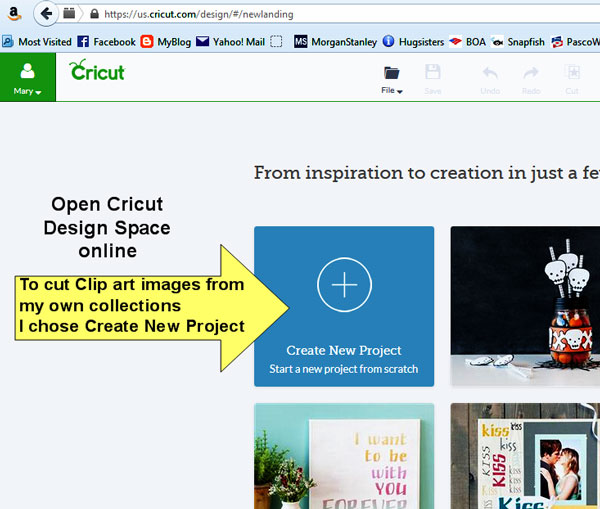
On the workspace Canvas, there is an option to "Upload Image",
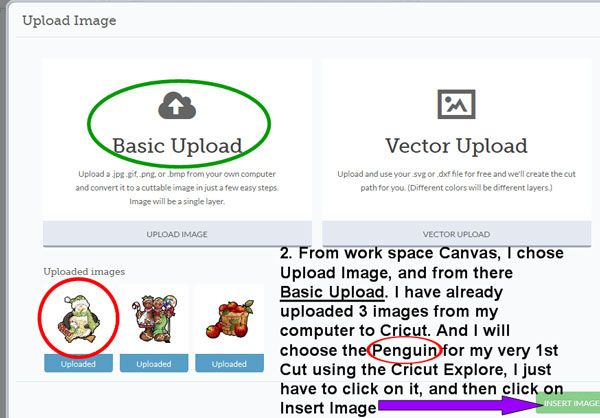
so I clicked on Upload Image and chose Basic Upload -
In this particular screen shot
I had already uploaded 3 images using Basic Upload, to the Design Space,
and all I have to do is Click on the image I want,
and insert it to my workspace canvas.
see >Cricut Design Space Reference Guide & Glossary
for more information about the online application.
2. Next I sized and arranged the image on the Canvas
when done, I clicked on GO icon in upper right, and followed the prompts to print
image using my printer, and then place that printed sheet (I used 8.5x11 White Card Stock)
onto the Cricut Explore sticky mat (the mat included with machine is 12x12)
and load it to the machine, and follow on screen prompts and cut the image.
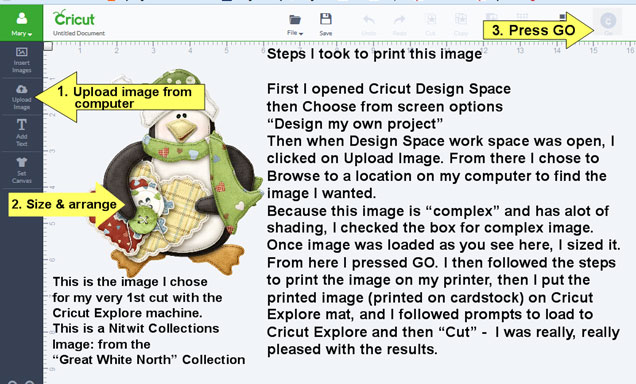
**image used is from the NitWit Collections - Great White North collection**
The image is in PNG format. It is Important to Note > there are SIZE limitations to how big you can make your image on the online canvas,
the software assumes you are printing from a printer that handles 8.5x11 material.
And there has to be room to apply all the registration marks.
Here are the sizing measurements that show how large a printed image can be:
Excerpt quoted from online
Manual for the Cricut Explore >
Maximum image sizes for Print then Cut
Each web browser has different settings for printable area size,
which means that
Print then Cut images have different maximum sizes
depending on the browser you use.
If you save a project
in one browser and later open it another,
you may need to adjust the image’s size according
to the browser’s printable area settings.
Below is a guideline for maximum Print then Cut image
sizes in each browser.
Chrome: 5.5" x 8"
Firefox: 6" x 8.5"
Safari: 6" x 8.5"
Internet Explorer: 6" x 8.5" note in Dec 2016, Cricut no longer supports IE
Microsoft Edge available on Windows 10 computers: 6"x8.5
for those who use the Design Space App
on an iPad or iPhone: 6.75"x9.25"
UPDATE 2019, since July 2017, the Printable Area allowance is now
6.75 x 9.25 inches. It has NOT changed since then, and as of
Oct 2019, it is still 6.75 x 9.25 inches.
If you want to print and cut a larger image, you can Slice your larger image
into 6.75 x 9.25 sized pieces and piece together after printing & cutting with tape
here is a link to an older 2016 video showing an older version of Design Space
and a smaller printable area allowance, But the basics of enlarging an image
and slicing it are still the same
Super Size a Print then Cut
https://www.youtube.com/watch?v=nGnk6kkqwmU
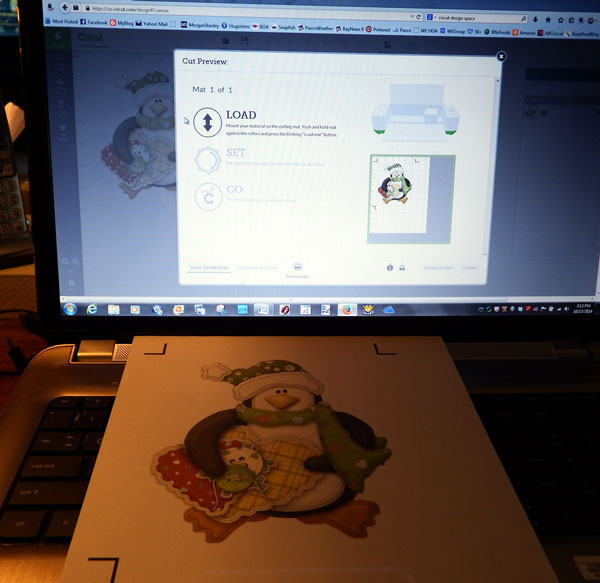
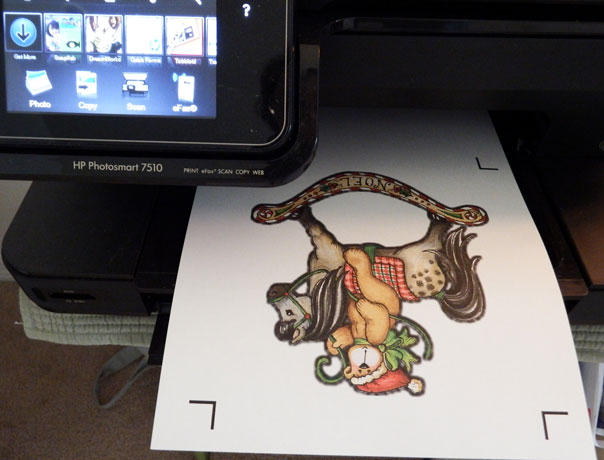
Here is photo of the printed image from my printer
(I used an HP Photosmart 7510 for this and other images on this webpage) -
the clip art printout ,has the registration marks
needed to aid the Cricut Explore in cutting the image. Note: you may on some images see
a blurry edge surrounding the printed image, that is the Bleed Line. The Bleed lines
are necessary for the Explore to follow and cut as close to the edge of the images to get a clean cut.
So don't be alarmed if your image's edges seem fuzzy or blurry when printed.
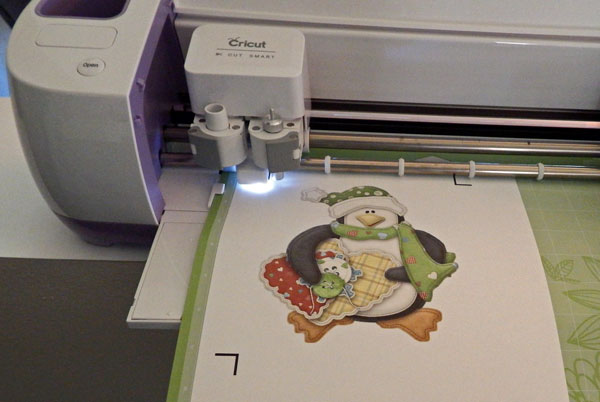
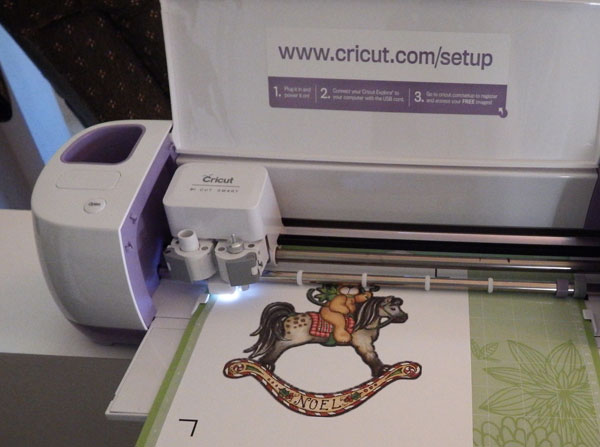
The screen prompts me to
Load the printed image to the Cricut Explore (after putting it on the mat)
I loaded it to the machine and pressed the Cut button when it blinked
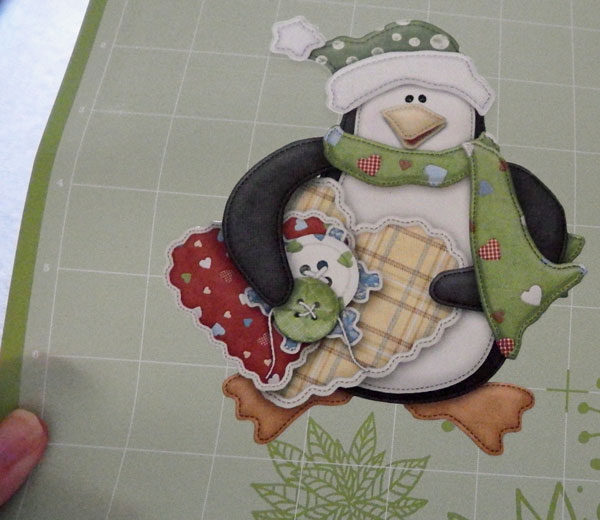
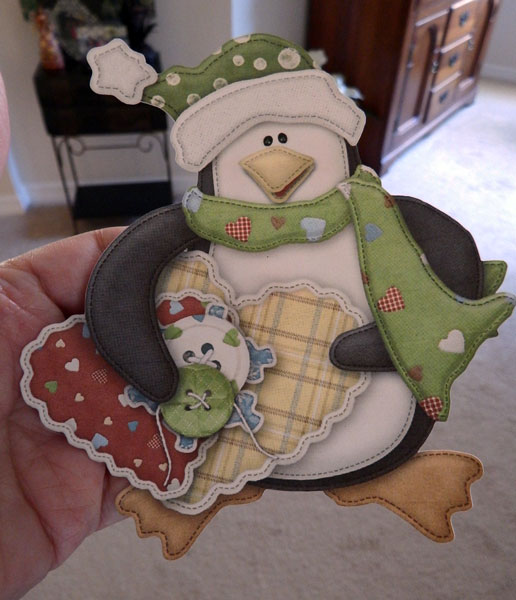
Taa-daa, I removed the cardstock from the mat and here it is all Cutout- YEA!!!
Successful beginning with my very First attempt at cutting a clip art image using my
Cricut Explore.
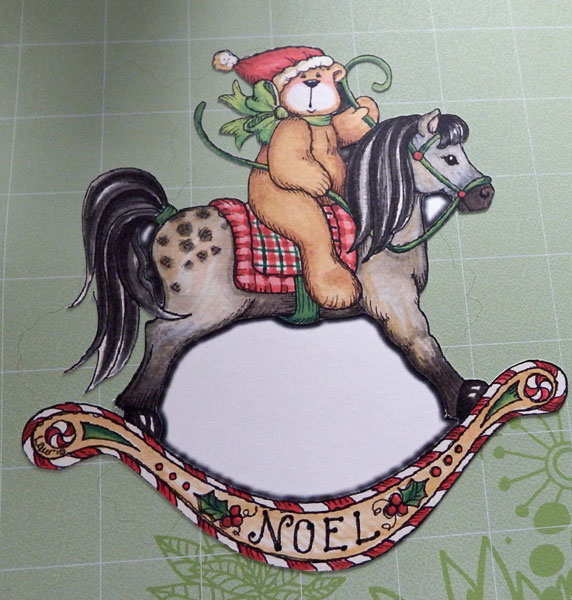
I did another cut, to see if I was just "Lucky" on that first one,
This time I used a bit more complicated image with small inside areas that
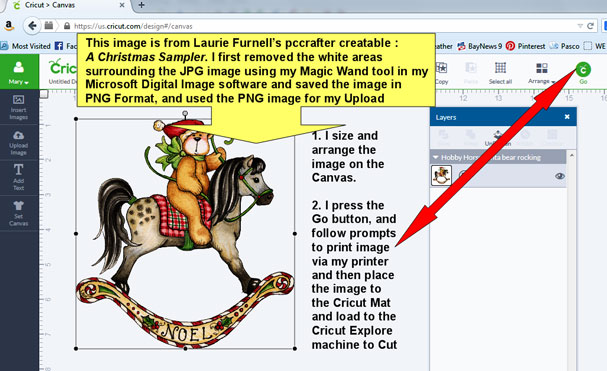
the machine would hopefully cut out. I used an image by Laurie Furnell, from
her PCCrafter creatable "A Christmas Sampler"
(this particular clipart set and image of the Hobby Horse is no longer offered for sale).
Note: I first created a PNG image
from the original jpg format image,
by using my Microsoft Digital Image software. I used my magic wand
tool to select and remove the white areas surrounding the original JPG image. I then
saved the image in PNG format to retain its transparency. I used the PNG image to
upload to Cricut Design Space.
I usually will prepare all of my images using my own offline graphic/photo editing software programs,
before uploading to
Cricut Design Space,
and I prefer to upload clip art that are already or saved in PNG format .
Note: Cricut Explore Design Space has a magic wand tool built in,
so that if you upload a JPG image,
you can remove the white areas before inserting it onto your Canvas,

Note: I purchased each of the Images that I am using to cut out on my Cricut Explore machine.
Please respect all Artists Terms of Use and Copyrights
I have purchased images from the former pccrafter.com website (pccrafter is no longer online)
Even though pcCrafter is no longer online,
all Terms of Use and Artist Copyrights remain in effect
for all clip art collections you may have purchased and
downloaded and installed to your computers.
Online stores I have purchased clip art from include:
Nitwit Collections,
DAISIE Company,and DigiWeb Studio,
along with many others over the years.
Do NOT automatically assume that images you find online
are free for you to use in any manner you choose.
There are many illegally shared clip art images online, please do not engage in illegal file sharing
or disregard Terms of Use or the Artists Copyrights.
Do NOT upload any of your owned images to websites such as Picasa Albums, Pinterest Boards, etc.
Most FREE images found on Digital Scrapbooking or Digital Clipart sites are for Personal Use Only.
Read all Terms of Use before you purchase or download clip art from reputable web stores
I uploaded the image using Basic Upload and chose "Complex images"
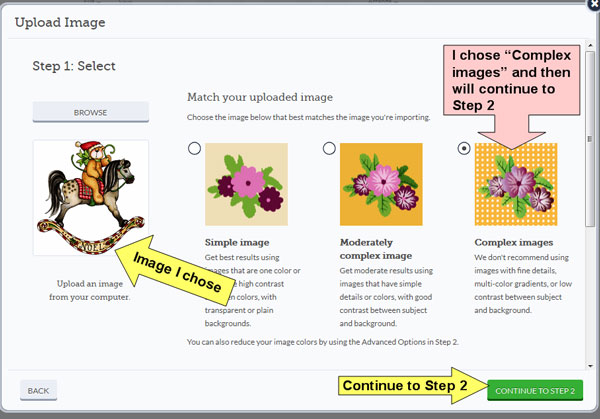
I sized and arranged the image, and then pressed GO button and followed the prompts
as I did for the Penguin image
Printed it out via my HP Printer on white cardstock
placed image on the mat for the Cricut Explore, and loaded to the Machine, and pressed Cut
(the cut button looks like the Cricut logo)
When done I removed the paper from around the image, and then the small inner pieces, when
I lifted the Hobby Horse image from the mat completely
lifted from mat, the main hobby horse image, leaving small pieces on mat
(for this photo, I had already removed the small parts, but put back on mat for you to
see each of the very small parts that the Cricut Explore cut out.
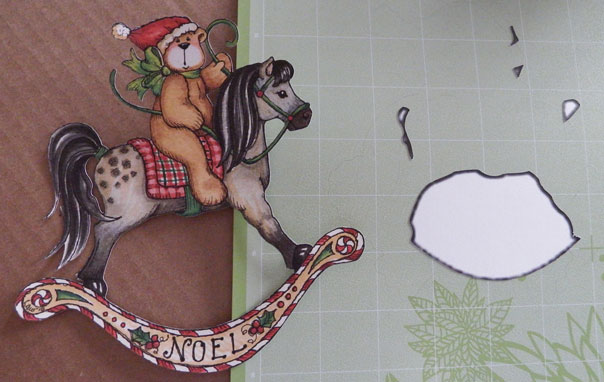
Taa-Daa -Success Again!!
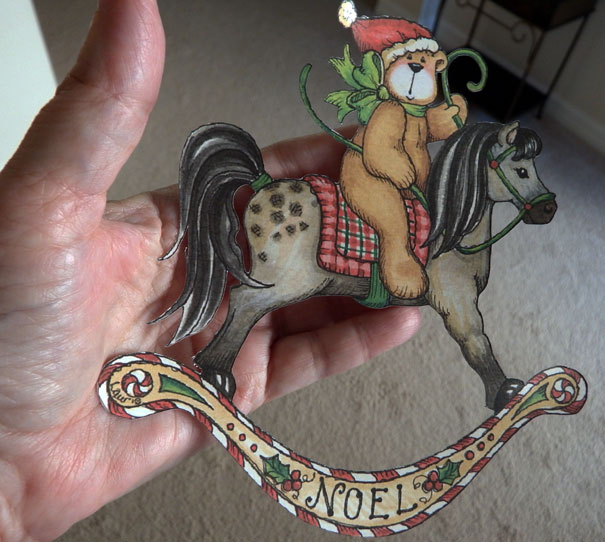
I am a Happy Camper and I continued to cut out 4 more clip art images

Image Credits : Upper left to right
Bear with Hearts from pccrafter creatable: My Honey by Rebecca Carter (no longer available for sale)
Punkin Time from Nitwit Collections : Lil Bits Punkins
Camping word from Nitwit Collections : FQB Gone Camping
Girl with cut out hearts from pccrafter creatable Welcome Winter by Tricia Santry
(no longer available for sale)
Lower left to right
Penguin from Nitwit Collections: FQB Great White North
Hobby Horse with Bear from pccrafter creatable: A Christmas Sampler by Laurie Furnell
(no longer available for sale)
Note: Laurie does have a clip art set available in her Etsy store named "Christmas Sampler", but it contains images
that were in her former pccrafter creatable "A Christmas Sampler 3" .
Note: she names sets that may have previously sold at pccrafter.com
as "Classic" Clip art, new sets are labeled Laurie Furnell Designs
~~~~~~~~~~~~~~~~~~~~~~~~~~~~~~~~~~~
I found the set up of the Cricut Explore machine, hooking it up to my computer via a USB cord** and using Cricut's online Design Space to upload images from my own computer, and printing and cutting out these images to be fairly easy.
**Update: in Dec 2014, I did purchase the Cricut Bluetooth adapter so that I could pair it with my other laptops. As of Nov. 2016 I personally own and use 4 laptops. One with Widows 7, 1 with Windows 8.1, and 2 with Windows 10. I am able to use Design Space on each of them and able to use the Print then Cut feature on each. I still have my Win 7 laptop connected to the Explore via the USB cord. For my Win 8.1 that computer did not come with Bluetooth, so I purchased an inexpensive USB Bluetooth Dongle, that I placed in a usb port on that machine and I was able to pair it with my Explore. The Windows 10 laptops do have Bluetooth, and I paired each with my Explore. To pair the 2 devices use the code 0000 (4 zeros) Note too: the model I own is no longer sold or made by Cricut. The models with AIR in the title have Bluetooth built in and only need to be paired with a Bluetooth enabled computer or iPhone or iPad. The Cricut Explore ONE model does require the purchase of the Cricut Bluetooth Adapter if you choose to pair it with any Bluetooth enabled computer or the iPad or iPhone. For iPad or iPhone users you need to have the Cricut Design Space free app on your devices. There is an App for Android device owners but as of Jan 2017, it is in Beta, and does NOT have all the features that iPad or iPhone users enjoy, and it may never have all of the same features. It is more difficult to develop apps for Android (or so says the folks at Cricut) All Cricut Explore machine models come with a USB cord if you choose to hook up your Explore to your computer that way.
It is Important to Note >
there are SIZE limitations to how big you can make your image on the online canvas,
the software assumes you are printing from a printer that handles white 8.5x11 material.
And there has to be room to apply all the registration marks.
Here are the sizing measurements that show how large a printed image can be:
Print then Cut updated in July 2017 to printable area allowance of 6.75 x 9.25 inches in all
Internet Browsers and for the iPad and iPhone Design Space app. As of April 2019, the
Print then Cut feature is not available on the Android app for Cricut Design Space
See Page 2 - older webpage > more of my experience with the Print & Cut feature of the Cricut Explore
See Page 3 - older webpage > more of my experience with the Print & Cut feature of the Cricut Explore
Making Cards using features of my software programs and cutting with my Cricut Explore
made in 2015
http://sippingtea.com/tuts/cardscutwithcricutexplore.html
How I Printed and Cut elements/images from a Digital Scrapbook Kit
made in 2016
http://sippingtea.com/tuts/printncutdigielements.html
Cricut Explore FAQs
See the HELP and LEARN pages of Cricut for the most updated information.
Design Space is an evolving program. I made this and other webpages when I
first got my machine in Oct 2014 and in the months ahead as I got used
to using the Print then Cut feature. The basics of how I do things remains the same
but features and the look of Design Space have changed over the years.
http://learn.cricut.com
The Help Page of Cricut has lots of helpful
information, FAQs, user manuals, short videos and
contact information for Cricut.
https://help.cricut.com
Cricut Explore and Maker machine Comparison chart
help.cricut.com/hc/en-us/articles/360009505193-Cricut-Machines-Comparison
System Requirements - Design Space
help.cricut.com/hc/en-us/articles/360009556033-System-Requirements-Design-Space
User Manuals >> learn.cricut.com/cricut-explore%C2%AE/manuals/cricut-explore
How to install or uninstall Cricut Design Space
check to make sure you have a compatible browser. You
will need one of the following:
• Google Chrome®
• Mozilla® Firefox®
• Microsoft Edge
• Apple Safari®
Once you are in your Browser of choice, just link to design.cricut.com and you’ll be
walked through a quick setup flow and overview of Design
Space. That's it!
How to Install or UnInstall Design Space
help.cricut.com/hc/en-us/articles/360009428814-How-to-install-or-uninstall-Cricut-Design-Space
Design Space plugin loop troubleshooting help.cricut.com/hc/en-us/articles/360009387194-Design-Space-plugin-loop-troubleshooting
Troubleshooting issues you might be experiencing
help.cricut.com/hc/en-us/sections/360002022634-Troubleshooting
Phone Customer Support USA/CANADA: 877-7CRICUT
Mon. - Fri.
9 a.m. - 8 p.m. USA Eastern Time
Find information for Online Chat at the bottom of any
Help page on the Cricut websit
Mon. - Fri.
9 a.m. - 11 p.m. USA Eastern Time
Design Space for Beginners learn.cricut.com/design-space-for-beginners
Design Space Features Comparison
The following chart shows a comparison of Cricut Design
Space feature availability across Design Space
platforms:
help.cricut.com/hc/en-us/articles/360009386114-Design-Space-Features-Comparison
Design Space Cheat Sheets lorrienunemaker.com/cricut-cheat-sheets/
What materials can your Explore cut with Blade
Suggestions
help.cricut.com/hc/en-us/articles/360009504773-Which-materials-can-I-cut-with-my-Cricut-Explore-and-Maker-machine-
Cutting Materials tutorials learn.cricut.com/cutting-materials/tutorials
All about Blades for Cricut Machines help.cricut.com/hc/en-us/articles/360009432294-All-About-Cricut-Blades
All about Cricut Cutting Mats help.cricut.com/help/cricut-machine-mats
(always condition brand new mats to remove a bit of the
initial stickiness. I like to pat a clean t-shirt all
over a new mat) To clean mats and renew the stickiness,
just wash with dish soap and let dry.
Inspiration >> inspiration.cricut.com
How to Pair a machine via Bluetooth help.cricut.com/hc/en-us/articles/360009380974-How-do-I-pair-my-Cricut-Explore-or-Cricut-Maker-machine-via-Bluetooth-
What Vinyl to use for What >> cleversomeday.com/which-vinyl/
Which Vinyl Should I Use? A Beginner’s Guide to
Different Types of Craft Vinyl >> persialou.com/which-vinyl-should-i-use/
The basics of the Print then Cut feature >>
youtube video by Lorrie Nunemaker published July 2017 www.youtube.com/watch?v=eL6kE4TjupA
**Note there are changes to the editing canvas area of
Design Space that occurred on Jan 8th 2019 :
Here is information about the Update to Design Space
that occurred on Jan 8th 2019 ---> Important Changes
to Design Space!
January 8th, 2019 • Contributor: Stephanie Gramann,
Cricut Software Product Manager inspiration.cricut.com/linetype-fill-design-space/
and here is link to the Design Space Help page on Cricut
- check out the Canvas Overview of Design Space ---->
help.cricut.com/hc/en-us/sections/360001958093-How-To
.
Don't overwhelm yourself with trying lots of different
things or using several different materials, it will
frustrate you. Just learn one technique at a time. There
are Youtube videos for just about everything you can do
with a Cricut Explore or Maker machine.
Here is information about the Update to Design Space
that occurred on Jan 8th 2019 ---> Important Changes
to Design Space!
January 8th, 2019 • Contributor: Stephanie Gramann,
Cricut Software Product Manager inspiration.cricut.com/linetype-fill-design-space/
and here is link to the Design Space Help page on Cricut
- check out the Canvas Overview of Design Space ---->
help.cricut.com/hc/en-us/sections/360001958093-How-To
.
This is link to Melody's video about the changes --->
New Design Space Line Type & More Just Released!
Cricut Update! Melody Lane / Published on Jan 8, 2019 :
www.youtube.com/watch?v=bR4MgRhsS1c&t=76s
The Changes to Design Space on Jan 8th 2019 may make
watching videos made prior to Jan 8th confusing. Just as
watching videos prior to the change from Design Space 2
to Design Space 3 in July 2017 makes watching videos
made showing usage of Design Space 2 confusing to watch
compared to the now current versions of Design Space.
It's important to remember that Design Space will always
be an evolving software program. And yes that can be
frustrating when trying to learn the program and
watching outdated videos to learn by.
Here is a link to the page that tells about recent and
past feature additions to Design Space 3 for Computer
Users >>
help.cricut.com/hc/en-us/articles/360009555433-Release-Notes-Design-Space-Windows-Mac-
Release Notes: Design Space (Windows/Mac)
January 8, 2019
Same features. New location!
• From now on, change Linetype (Cut, Draw, and Score)
and Fill (Print Then Cut) of an object from the Edit
toolbar.
• Change the Linetype of multiple objects with a new
multi-select feature!
• Image, font, and cartridge (image set) information can
be found by right-clicking on the Layers panel.
help.cricut.com/hc/en-us/articles/360015311334-Release-Notes-2019-01-08
Join the Melody Lane Cricut Design
Space with Melody Lane Facebook Group
https://www.facebook.com/groups/CricutDesignSpace/
Every Saturday morning at 11am
eastern time, Melody Lane hosts a Learn Design Space
features class.
The video is recorded to watch at anytime but if you
watch live you can ask questions of Melody.
Subscribe to her Youtube channel and click on
Notifications
so you will be notified of new videos she posts >>
www.youtube.com/user/MelodyLane815/videos
Sign up for her emails bit.ly/emailfromMelody
Consider becoming a Patreon supporter of Melody, for as
little as $2 a month - you'll get access to files
for use in Cricut Design Space and with an Explore
or Maker machine >> www.patreon.com/Melodylane/overview
Features of the iPad / iPhone app for Design Space inspiration.cricut.com/cricut-design-space-ios-app/
My online album with Print then Cut and Cut only
projects
www.flickr.com/gp/24663470@N06/4i59HS
Info about the Print then Cut feature
The Print then Cut feature updated to the
Sensor/Registration mark of a black outline box around
the image in July 2017
when we went from Design Space 2 to Design Space 3.
Lorrie Nunemaker did a good video on July 22 to show the
update version of Print then Cut.
See her video at : www.youtube.com/watch?v=eL6kE4TjupA
.
But Design Space itself did an update to the editing of
where stuff is
and now what they call "Line Type" and "Fill"
option in the top portion of DS on Jan 8th 2019
- so people watching videos between July 2017 and
Jan 7th 2019,
may be confused by what they see on the screen now.
And gone are the little picture icons for the printer,
the scissors, the pen, etc. Now they use the words next
your layers of Cut \ Print, Cut, Draw (which means you
are writing with pen or marker in your machine).
But the Black outline box and the size of the printable
area allowance of 6.75 x 9.25 are still the same for the
Print then Cut feature. In the Design Space 2 the sensor
marks were 3 L brackets and the printable area allowance
was smaller and different depending on the Browser you
used. It is the same now for every browser. Your images
can be smaller but not larger than 6.75 x 9.25 inches.
If you own an Explore you need to be using any White
Printable 8.5x11 media that your own Inkjet Printer can
feed through successfully. If you own a Maker, you can
use white or light color or light patterned 8.5x11
Printable media that can go through your inkjet printer
successfully. See the help pages of Cricut to see the
new layout of where things are in DS after the changes
on Jan 8th 2019 help.cricut.com/hc/en-us/sections/360001958093-How-To
. **this is the section on Print then Cut : help.cricut.com/hc/en-us/articles/360009387274-How-do-I-Print-Then-Cut-in-Design-Space-
Note: your Printed images must be Flat - no Layers
images.
You can compile a design or take an image with layers
and select ALL and Flatten to make it a on flat
printable image.
The only things that you would ever Attach are:
Scorelines
and
Text that you are writing (drawing) with a Pen or
Marker that you are placing in your machine to
write out the text
and Shapes that you might actually want cut from a
solid shape or a another image. For example if you
want a circle cut from a tag or a square cut from
another image for an opening, you can just Attach that
to the solid or flat image and it will be cut from it.
And Attaching anything is always done Last after you
have Flattened everything you want Printed.
If you have text that you want Printed on something -
you have to Flatten it to a solid filled shape or
another flat image. If you have a transparent background
or just an outline of a shape
without a solid filled in portion of the shape -
your text will be cut out on its own. So just be sure
you flatten the text to a solid shape or another image.
Then your Cricut will just cut out the shape or image
with the printed text printed on it.
Use an Inkjet Printer and any white 8.5x11 PRINTABLE
media that can go through your own printer correctly to
place the black outline box around the image correctly.
Some media may be too thick to go through some printers
correctly and won't work well with the Print then Cut
feature.
If you own an Explore it is best to use only White
Printable media,
but if you own a Maker you can use white and or light
color or light patterned PRINTABLE 8.5x11 sized media
that your inkjet printer can feed through properly.
The Printable Area Allowance of the Print then Cut
feature of Design Space is 6.75 x 9.25 inches.
Yes there will be waste of your 8.5x11 sheets of
Printable media.
Make the best use of the printable area you have
available when doing print then cut projects.
If you can fit smaller printable images within the area
of along with a larger image -
then Print and Cut such images - even if you don't need
them for a current project but can make use of in other
projects.
What I like to do, is I put a rectangle on the canvas of
Design Space and size it to 6.75 x 9.25
and size and arrange as many images I can within that
rectangle.
Then once I have that done, I delete or hide the
rectangle,
select All - Flatten them if not flattened images
already, and then Attach to keep the configuration of
the way I have them laid out. **if I have to attach
anything like a scoreline or text I want written with a
pen, etc. I make sure the Images themselves are flat,
but then add the scorelines, and / or the text to write
(and make sure the text is set to Draw) and then Select
All and Attach.
Always choose to keep the Bleed line on your Print then
Cut projects, as that allows your machine to get close
to the edge of your shapes or images and not leave any
white edges.
You may not like the way the images look when printed
because of how blurry the edges look with the bleed line
around them, but that is a good thing, once your images
are cut, you'll see the edges should be clean.
FACEBOOK GROUPS - I have included some quoted excerpts from these groups, but before joining, please read complete Group details.
Cricut Lovers Guide to Design Space
https://www.facebook.com/
This group is to learn, share and inspire each other as we use our Cricut Explore and Design Space. Feel free to post and answer questions and post your projects and share your Design Space files.
Let's Learn Cricut Explore
https://www.facebook.com/
Let's Learn Cricut
https://www.facebook.com/
Explore and Design Space help while still celebrating Cricut Craft Room!
Cricut Newbies and Pros
https://www.facebook.com/
We are a welcoming group with emphasis on learning how to use our machines to create beautiful things! We encourage questions and love to share. We love to learn new things, too!
I Luv My Cricut
https://www.facebook.com/
A place to learn how to use your Cricut products, ask for help with your Cricut products, share Cricut projects and tell others how much you LUV your Cricut.
Note that any discussions about using 3rd party software to cut designs with older machines will be removed.
I Luv My Cricut > Admins YouTube channels
Karin's YouTube channel is at https://www.youtube.com/user/
Lorrie's YouTube channel is at https://www.youtube.com/user/
Melody's YouTube channel is at https://www.youtube.com/user/
Cutter Software
https://www.facebook.com/
Cricut the Official page, this is NOT a Group, but more a Cricut news and announcements, and promotions page, you can Like the page, but you don't need to Join it.
https://www.facebook.com/
Sign up if not already to Cricut's Mailing list
http://us.cricut.com/home/
Other links of Interest:
*note many of these links were gathered and posted on this page in Oct - early Dec 2014. There have been improvements and enhancements to Design Space since that time and many new articles and youtube videos can be found online showing the how-to's etc. for using Design Space.
Unbox the Cricut Explore , Set up and first cut
https://www.youtube.com/watch?v=OqnlWf9_5Cc
Another out of the box (note: this video shows
the handy tools set -
my machine did not come with those, they can be
purchased separately,
or if you already have the tools that you used on other
Cricut Machines, you are good to go) > https://www.youtube.com/watch?v=lv5ZAJTYoro
Comparisons
with Silhouette Cameo
- most of these were posted in 2014 when
the Explore was first introduced
Cricut
Explore
vs Silhouette Cameo
https://cleversomeday.wordpress.com/2014/12/02/whichisright/
cricut explore versus silhouette cameo
http://www.lorriesstory.com/2014/09/silhouette-cameo-vs-cricut-explore.html#.VDbkYRbU2M8
The Silhouette Cameo vs. The Cricut Explore https://www.youtube.com/watch?v=f5gllQ7l5c0
Silhouette Cameo VS Cricut Explore (An Unbiased
Comparison and Overview)
https://www.youtube.com/watch?v=lx99aN10z7c
also > https://www.youtube.com/watch?v=aox_OHb-d8o
Cricut Explore vs. Silhouette Cameo
https://www.youtube.com/watch?v=aox_OHb-d8o&list=UU6a8c7f3876fe77ca
and
see too: http://www.allthingsthrifty.com/2014/09/cricut-vs-silhouette-which-one-is-better-an-unsponsored-opinion.html
Silhouette Vs. Explore - Design Space/Silhouette
Designer Software
https://www.youtube.com/watch?v=SPPfuK9HPBQ&list=UU48f3dfb8af473c14
Cricut Explore versus Silhouette Cameo - thick
materials https://www.youtube.com/watch?v=9DrS_ouC-80
See also > http://www.kgdcraftermath.com/2014/03/cricut-explore-conclusions/
Cricut Explore Vs. Cricut Expression 2 > https://www.youtube.com/watch?v=cXgy519Qjqk
How to
Link Cricut Cartridges to Cricut Explore Design
Space https://www.youtube.com/watch?v=ZShMGJqdFTo
and / or > Linking cartridges to Design Space https://www.youtube.com/watch?v=JtACAK3uI3o
How to Cut & Print images using Paint.net and the
Cricut Explore - Tutorial https://www.youtube.com/watch?v=QsQLCviLkFk
Cutting your own rubber stamps with the Cricut
Explore https://www.youtube.com/watch?v=wMAjJWXHhqc
Print and Cut on colored paper http://scrapalette.blogspot.com/2014/09/card-matching-game-with-print-then-cut.html
Please DO NOT COPY content or photos to use them
on any other website or blog or Pin to a Pinterest Board.
Thank You.
Please Honor all Terms of Use and Artist Copyrights
for any clip art images you use with your Cricut Explore
Remember just because you may use Google to find an image online,
the image may NOT be copyright free or be allowed to be used or
downloaded if the original designer or artist has not granted such rights.
Please be careful with images downloaded free before placing them on items you might
consider selling. Make sure you have read all Terms of Use for images you are considering using.
Also be careful before displaying projects online that might be using Copyright
or Licensed images that you personally have not received explicit permission to use from the
artist, designer or website store, facebook group, or online blog or pinterest pins,
that you obtained the images from.
When posting photos of projects using images online,
you should post information giving credit to the Artist or Designers,
and
or locations of where you obtained the images from.
Do NOT share images that you purchased or even obtained for free from legitimate sources.
You can Share the
link to the images or website locations or stores etc. -
so that others can read and understand usage of such images.
I am not responsible for content on Linked websites or videos.
The external links are provided as Informational only links
related to the Cricut Explore machine
this page created Oct. 2014 & updated June 2015, February 2016, Jan 2017, April 2017, April 2019
*NOTE: many of these links were gathered and posted on this page in Oct 2014. There have been improvements and enhancements to Design Space since that time and many new articles and youtube videos can be found online showing the how-to's etc. for using Design Space
and opinions and comparisons for the Cricut Explore line of machines.
to top of page
Online Support for Cricut Explore Users
https://help.cricut.com
See Page 2 > more of my experience with the Print & Cut feature of the Cricut Explore
See Page 3 > more of my experience with the Print & Cut feature of the Cricut Explore
new page created March 2015, Making Cards using features of my software programs and cutting with my Cricut Explore
http://sippingtea.com/tuts/cardscutwithcricutexplore.html
New page created 2016 >> How I Printed and Cut elements/images from a Digital Scrapbook Kit
http://sippingtea.com/tuts/printncutdigielements.html
New page April 2017 >> How I made a set of Placecards