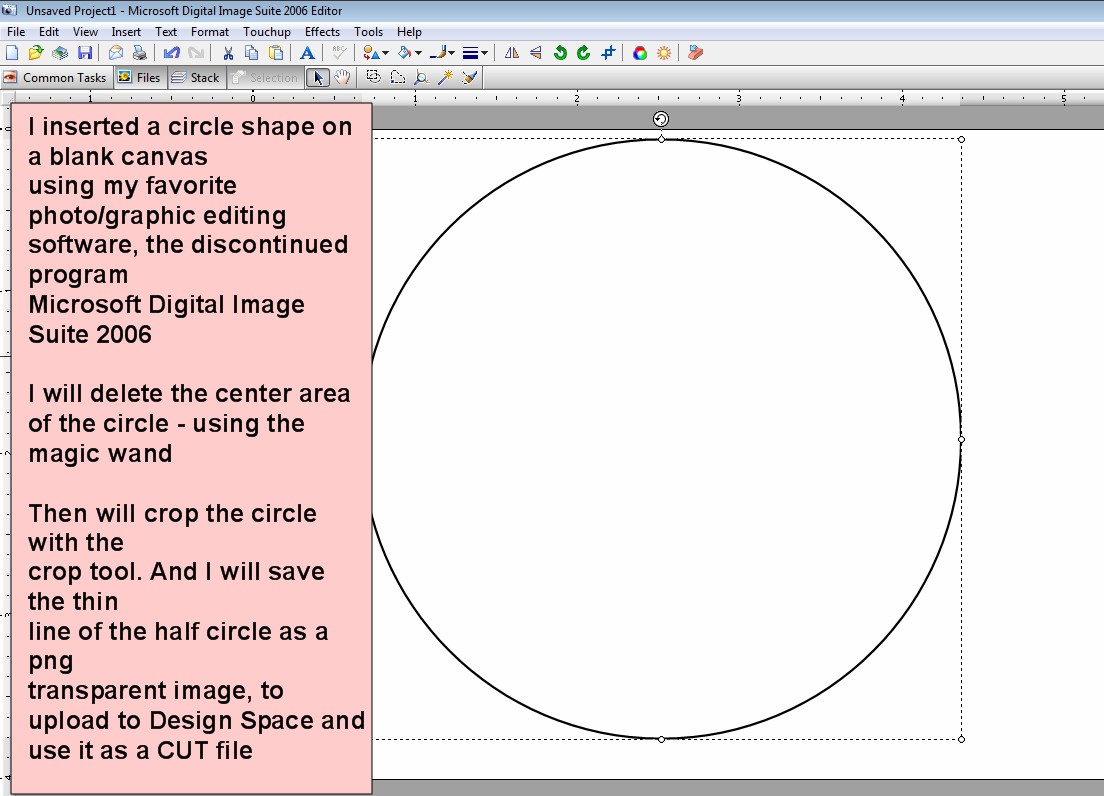
I first made a half circle image using my Microsoft Digital Image Suite 2006 software program (it is my favorite program to use, and for me personally the most user friendly. I have other photo/graphic editing programs but favor using MS Digital Image (a.k.a DIP). The program is discontinued and no longer made or supported by Microsoft (It is still available for sale on Ebay) - I have installed it on each of my 4 laptops, and it runs fine on Windows 7, Windows 8.1 and Windows 10) It is the program I use most often when compiling or working with my collections of clipart images that I have amassed on my computer. I have clipart collections from a variety of sources. Some sources are no longer online, and the images I have can no longer be purchased or found online.
NOTE: these place cards could also just be made by folding over a 4x4 piece of cardstock, and there is no need for the half circle stand up portion, this for me personally was just to figure out if I could slice a half circle from the card and have it become like a tab on top of the place card :) - the images applied with 3d adhesive pads could just as easily be place on the cards without the tab.
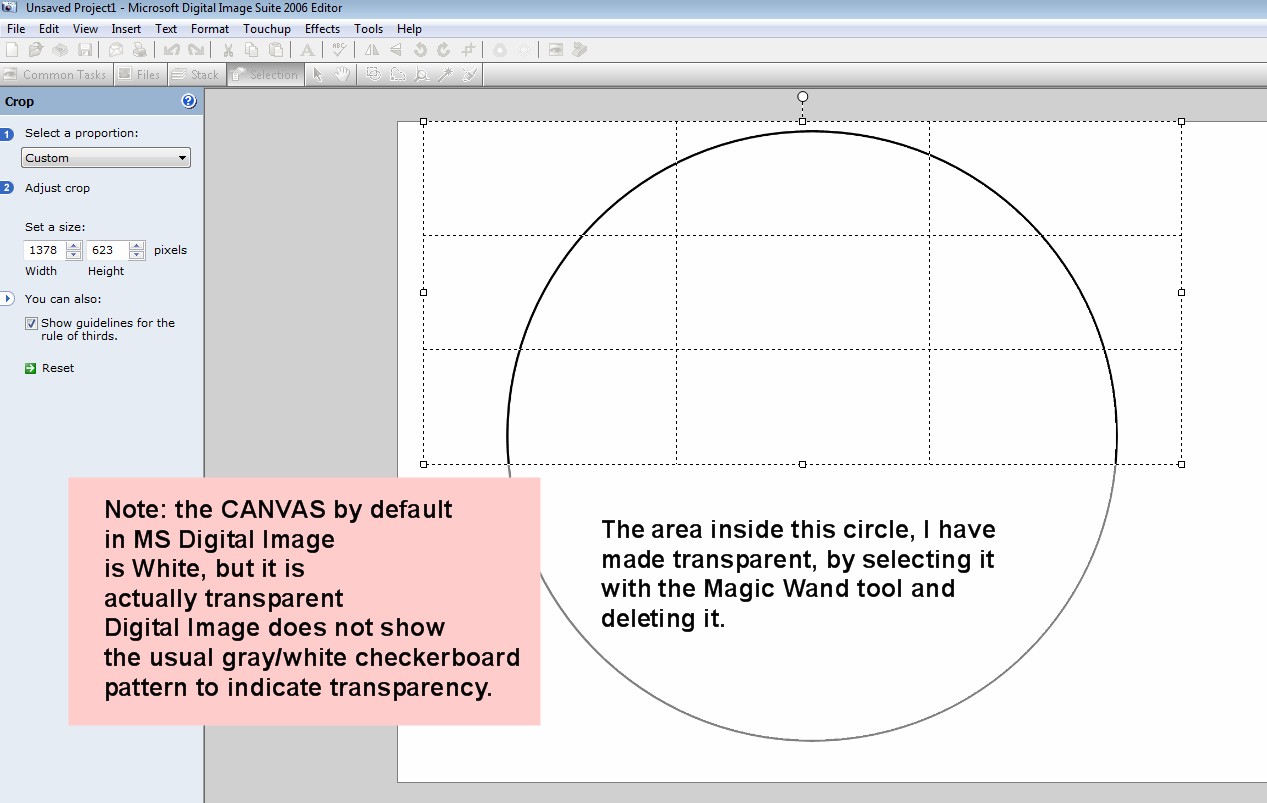
Now on to the Half Circle thingy. In Digital Image I created a new blank canvas sized 6x6, and inserted a circle. The circle by default will have a 1pt black edge. Next I deleted the white inside of the circle, by selecting it with the magic wand. The canvas in MS Digital Image is transparent, but white, so when deleting the white inside the circle, it may not be apparent that the inside is now transparent. But I know that it is - wink - wink.
So I am left with a thin line circle that is transparent inside. My goal is to just have the line, to use as a "Cut" line in Design Space.
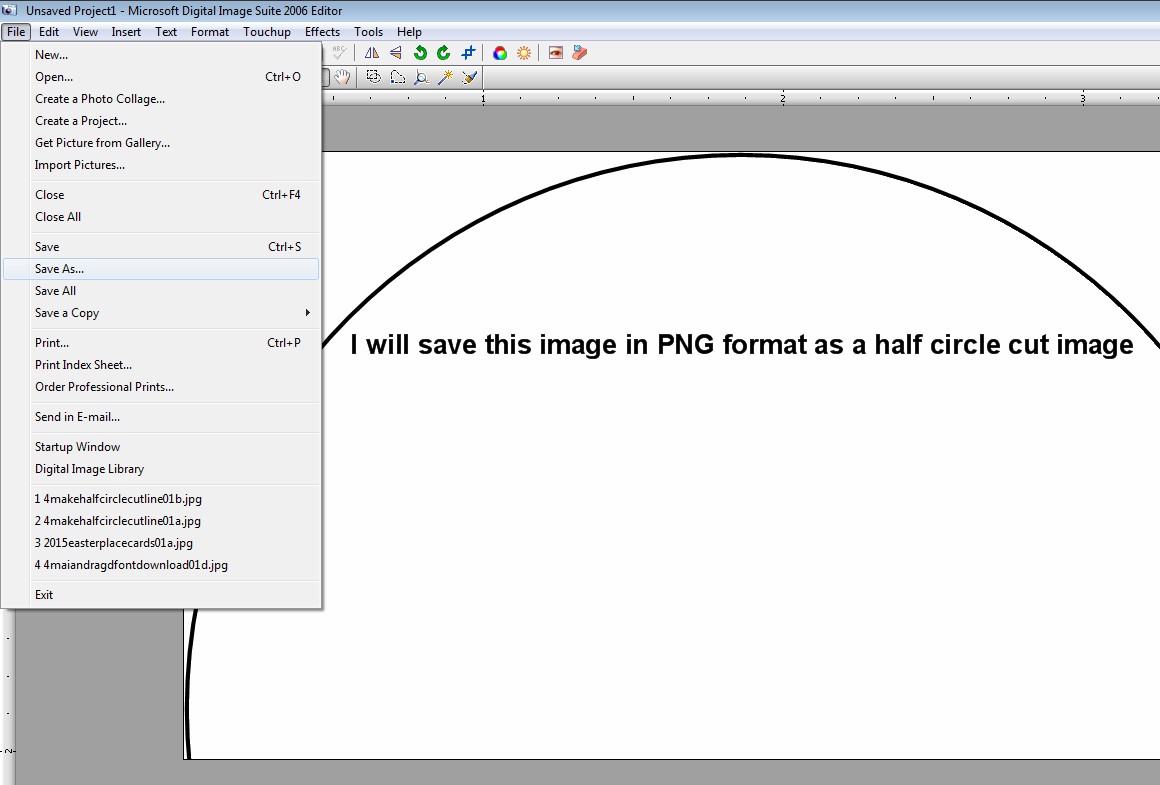
Next to make my half circle - I just crop the circle in half. That leaves me with a color line of a half circle. This is what I will NAME & SAVE in PNG format and UPLOAD to Cricut Design Space to use as a "CUT" line.
In Design Space, I start a new project:
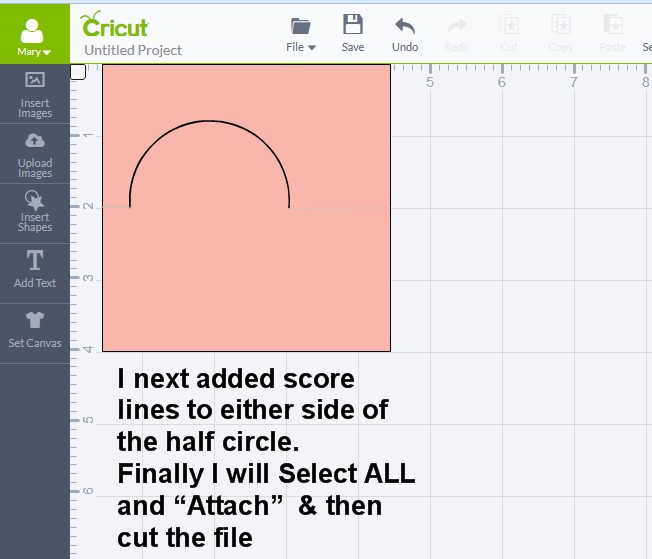
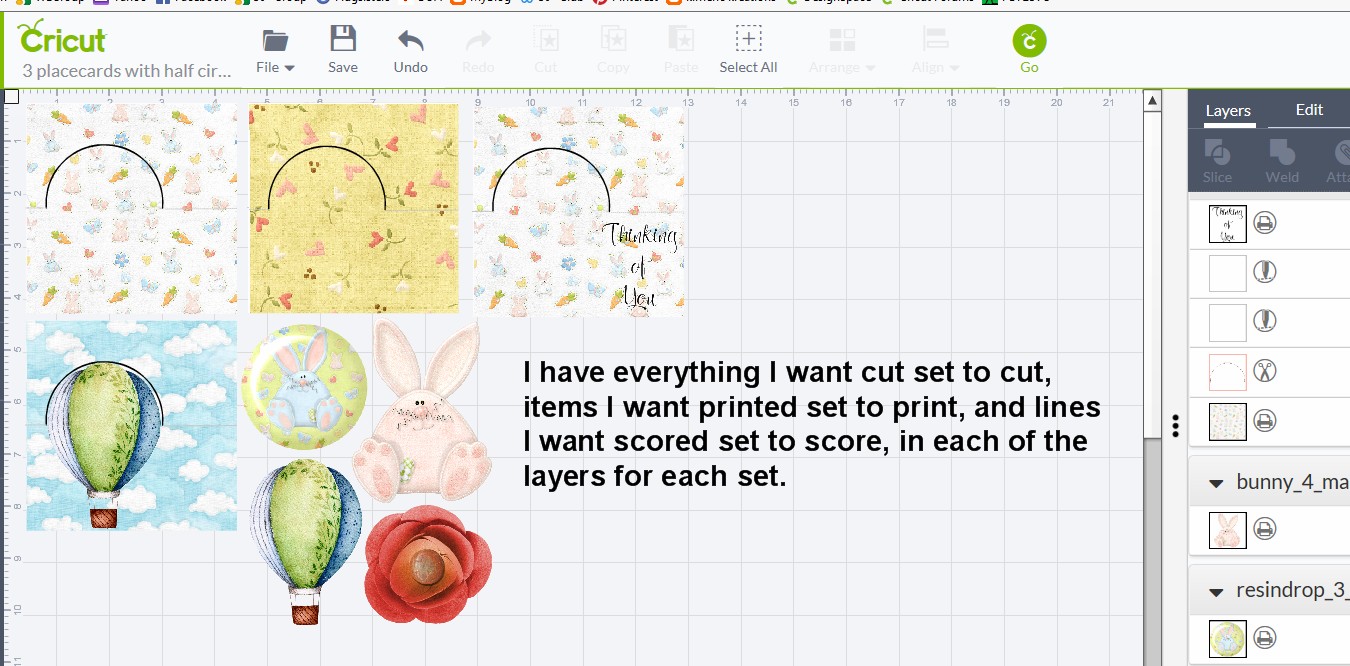
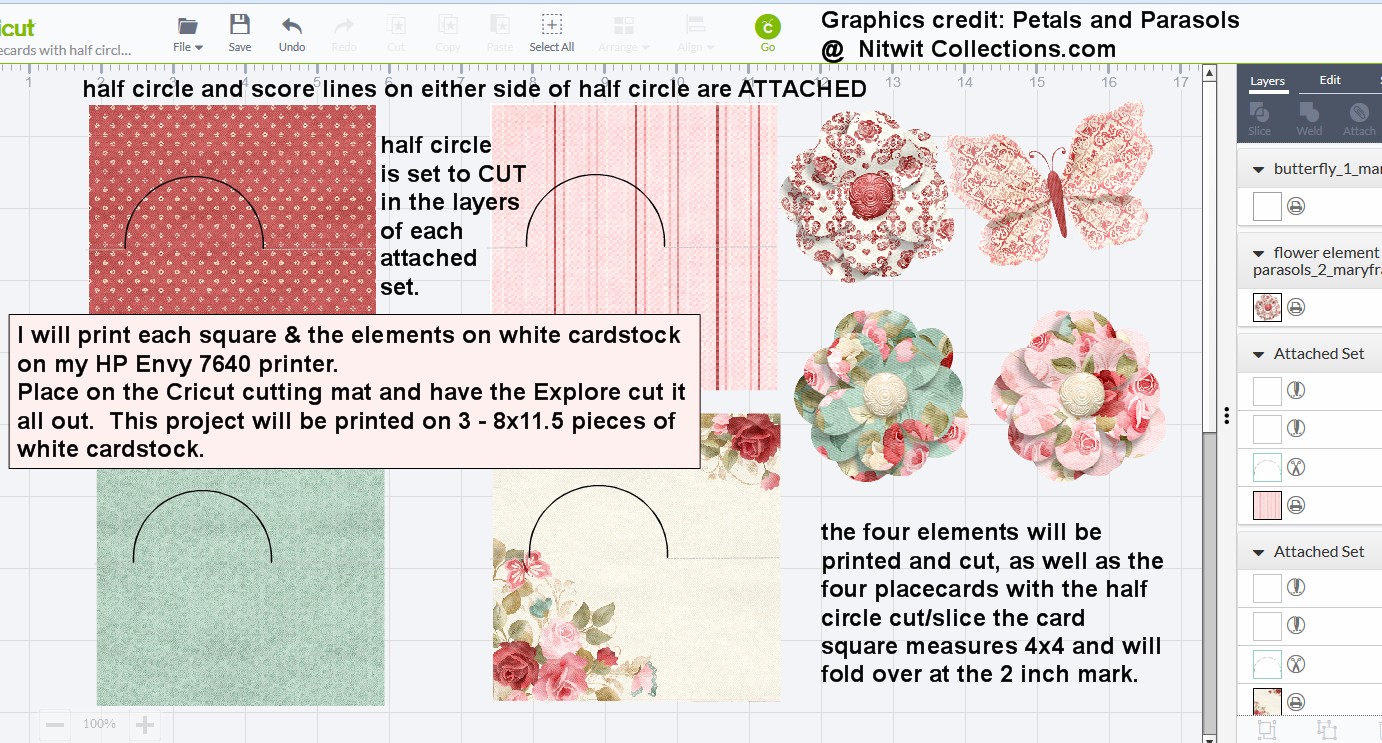
To make my place card with a stand up portion to be the half circle, I will first create a square for my place card. For my example, I am making my squares, 4 x 4 and will fold over at the 2 inch mark. My cards will be 2 x 4 - but will have the half circle standing up. It is on the half circle that I will place other elements / graphics / clipart that I will Print then Cut with the Cricut Explore
These are screenshots with notes on my process.
Making my half circle cut image
Then I crop the Circle in half
I then Name and Save the half circle edge in PNG format. I name and save it to a location on my computer that I will
remember and associate with such images.
Then I can UPLOAD this image to Cricut Design Space - this is a Simple image, so I would select it as the type.
NOTE: all of my screen shots of Design Space, are shown using Design Space 2, eventually by the end of
April 2017 or in May 2017, Design Space 3 will be released and so in that version, screens may be different.
But I believe that similar steps will be followed in DS 3. (*best thing about DS 3, it won't rely on the pesky
ole plugin of Adobe Flash, and while I don't have problems using Design Space, I know that many crafters
are frustrated by some of the issues that come with using Design Space in its current version)
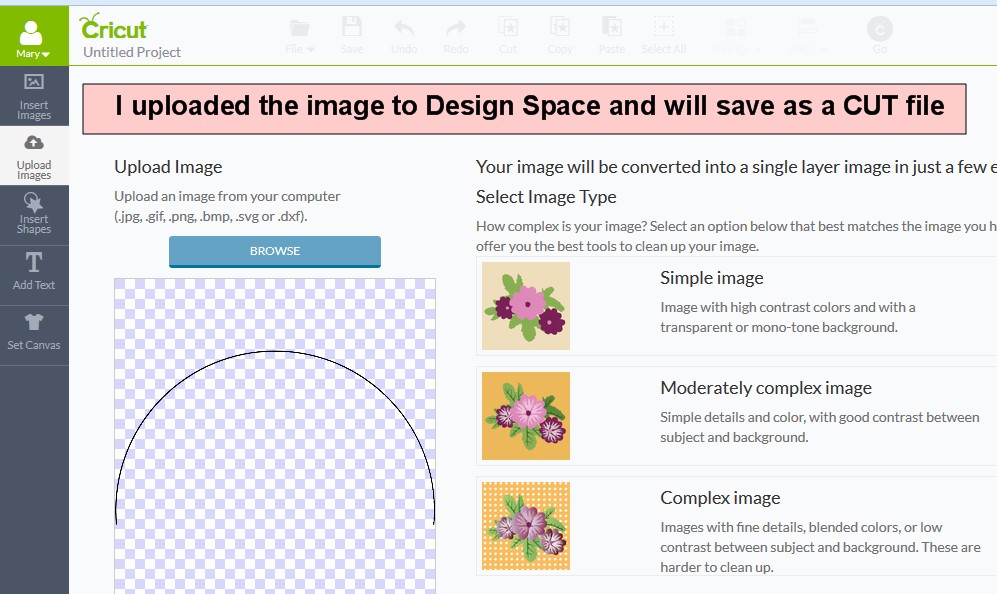
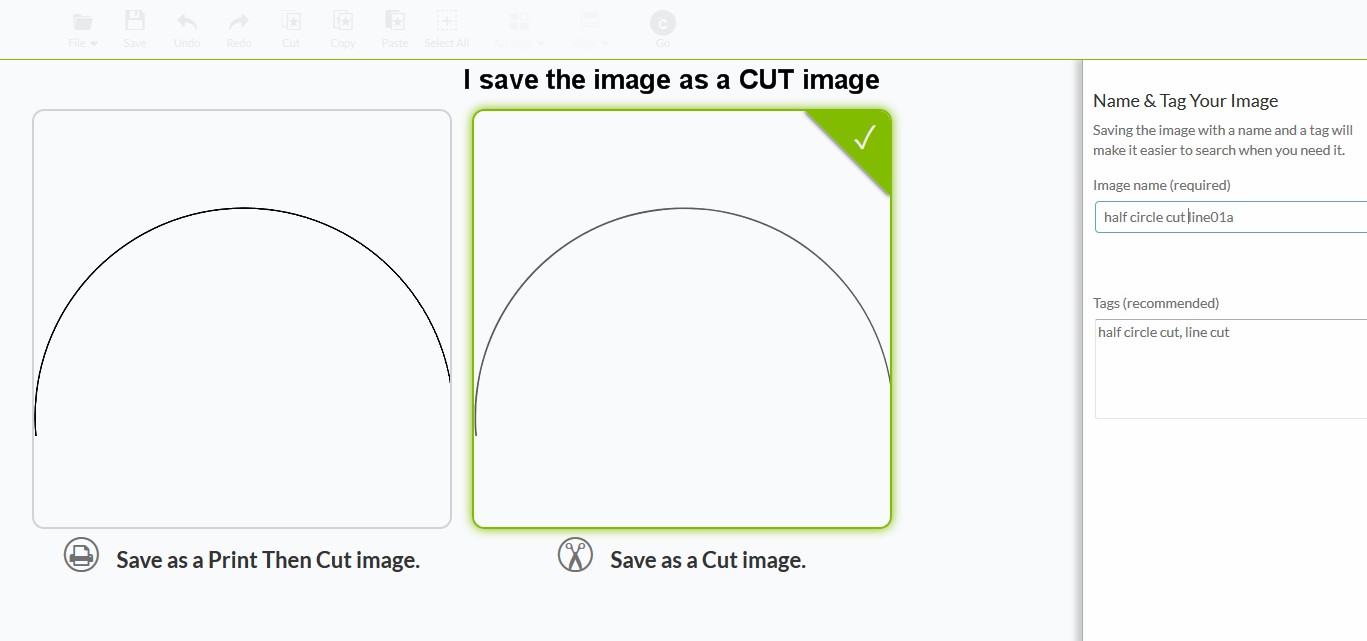
Because this image is in PNG format, Design Space will consider it a Print then Cut image
(as it does with PNG, JPG, and GIF images) ,
but in the Save Screen I can choose to save as
a CUT only image. If you designate a color or image that has colors and shading in it, such as
a clipart image, and you choose to Save it as a CUT only image - the image will change to just
a shape or silhouette of the image in a dark gray color. The image will lose all of its original detail
And if the image appears as a solid box, instead of the outline, then go back and make sure
you have deleted the white background around the image using the magic wand, to make it transparent.
Design Space assumes that PNGs, JPGs, and GIFs are going to be Printed then Cut, as they have
colors and shading etc. The half circle I created I saved in PNG format to keep its transparency.
Microsoft Digital Image does not have a feature to save any image in SVG format.
SVGs that you obtain from other sources or make yourself and upload the SVGs to Design Space,
would be considered as Cut images, and if they have several colors, those colors would be their own layers.
When opening SVGs in the work area of Design Space, you may have to ungroup to get each of the
layers of all the different colors, so that each color can be cut from the necessary colored materials
that you may be using to cut for your particular project.
Note: sometimes it may take Design Space awhile to load the "Save as a Cut image" window.
I always tag my images, with names/words that I will use for searching for them at a later time in Design Space.
If you would like the half circle image I made, you may download it and save to your own computer and
upload to Design Space
link to >> Half Circle line image
Now for this example I will show screen shots of how I set up a simple template for my place cards
I start a New Project in Design Space, and bring in the half circle image
Then I insert a square shape and size it to 4x4, I also color it for visual purposes
I size and arrange the half circle on top of the square and place at the 2 inch line.
Then I insert 2 score lines, and size and place on either side of the half circle.
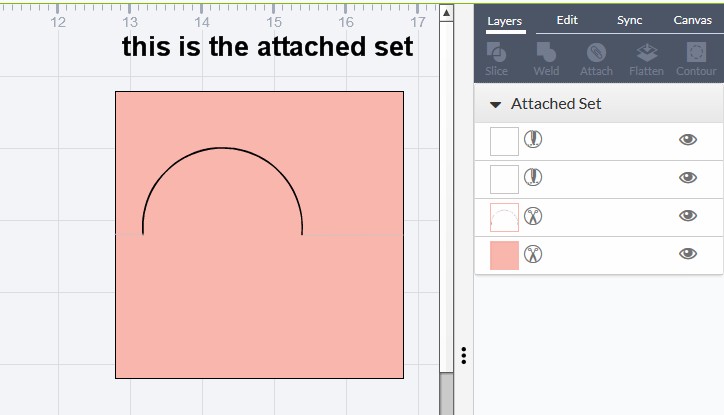
After placing everything, I Select ALL and ATTACH. This still leaves everything in layers, but all attached.
If I was to cut out the template - I could put any pattern paper/cardstock down on the mat and it would cut it
out and score the score lines, and cut out the half circle and cut out the square. I could then just fold over
and have a tent placecard with a stand up half circle. But before I cut it out, I would name and save this file/project
to my projects in Design Space. From this point though, if I want to do other things with this template such as
fill the square with a pattern, using patterns I have uploaded to Design Space, or use ones
that might by included in the Subscription plan etc. For doing that I would duplicate the
template for as many placecards that I might want to make at this time, and close out the eyes
on the layers of the original template, so as to keep my original.
And to add Print then Cut elements I would open images I have uploaded or that are in
Design Space, etc. and bring them into the work area. I would size and arrange the
images so that they would fit on the half circle or within it. And if I wanted to add text
I would normally insert text that is already an image, and I would just Attach it to the
placecard and use as a part of the Printed image vs trying to "write it" with a pen.
But it could be done either way, if you prefer typing out text and having a pen write it,
What ever way you choose, make sure to attach the text to the placecard, and in the layers
panel - designate what you want done with it, either PRINT or WRITE/DRAW
Personally, I try to create my text using my offline software, and save in PNG format
and upload the text as an image that I would use to FLATTEN to a solid shape and printed on the
shape and then have the shape Printed put on my Printer and then cut with the Explore.
**Note if I attached the text to a shape or another image, it would be Cut from the shape or other image.
The only things that should ever be Attached in Print then Cut projects are Scorelines, Text that you actually want
written/drawn with a Pen inserted in your machine, or a shape - that you actually want cut from a solid shape or image. Such as a
circle for a tag or stars etc that you will want cut out. Any Attachments should be done LAST after you have
Flattened everything that you are wanting to Print. Sometimes I hide the scorelines in projects that require a scoreline, and then
Flatten everything and un-hide the scoreline and bring it to the front.
So in this case of the half circle line - you will want to Attach that line last, as it is a CUT line, so you don't want to Flatten it to the shape
you want only to attach it, so that it remains in the place you put it on the placecard shape.
You can also find text images in Design Space images. If it is a shown as a written
text only, you can choose to keep it that way, or change it to print (which will make
it black/gray in color, and you can change the color) and what ever you choose,
make sure it is attached and you designate the layer to print or write.
Now I have the ATTACHED SET for the Template - score lines are set to score, half circle is set to cut
and square is set to cut. At this point I NAME and SAVE this project to my project files in Design Space.
Note this is my original template. If I want to do other things, such as fill with a
pattern and PRINT and CUT this placecard, I duplicate the original, to as many as I want to make
for this example I will make 4. And I close out the eye on each of the layers of the original template.
And just work with the duplicates.
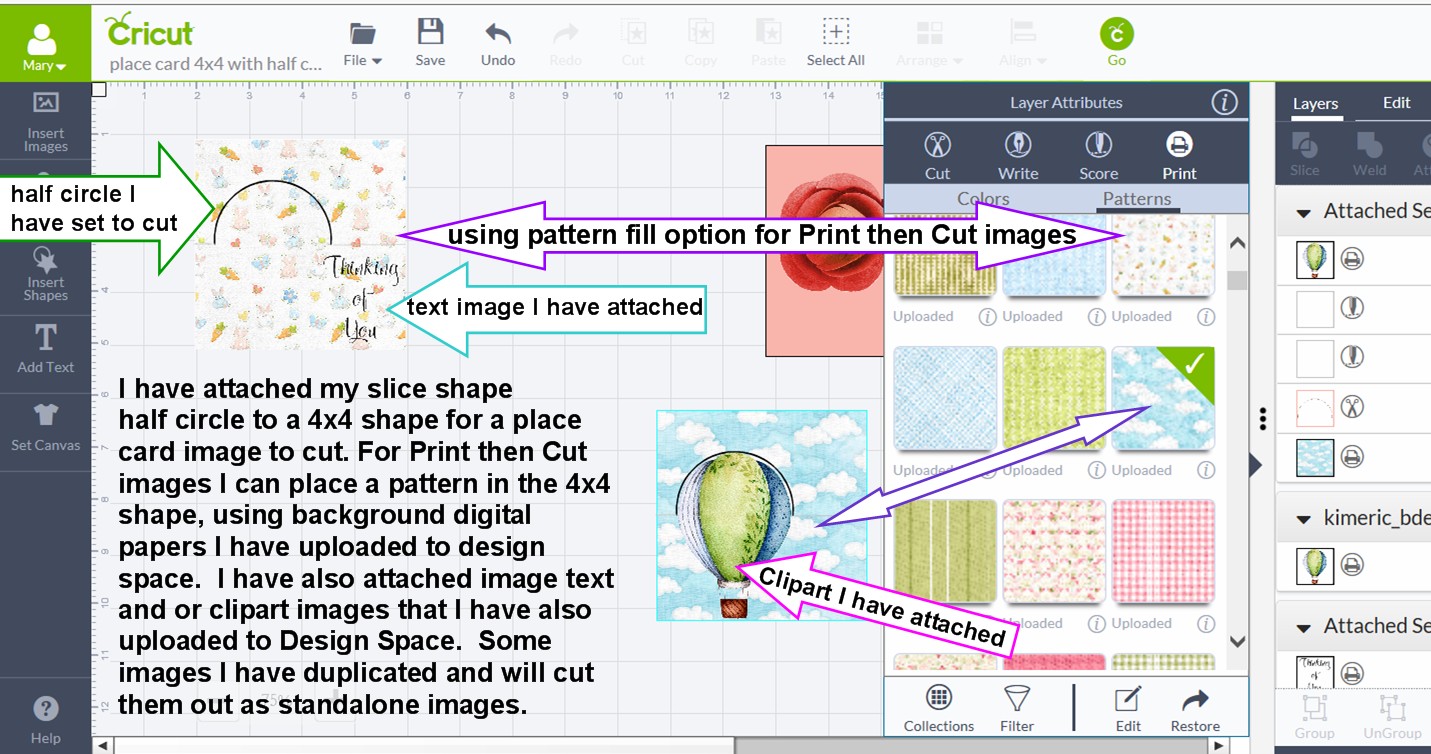
For my example, I am going to fill (duplicates) of the template squares with a pattern. I click on the square, and from
flyout menu, I choose PRINT, this action will turn both the cut half circle and the square to printed images
but I will change the half circle back to a cut line, after I fill the square with a pattern. I choose PATTERN
to then choose from my uploaded patterns. You can filter the patterns and also if you are subscribed
there are some available with the subscription and also there are some FREE pattterns available
to all users of Design Space, you can use the filter to find these.
(how to find free content in Design Space : http://help.cricut.com/help/cricut-explore-free-content
and how to upload patterns to Design Space : http://help.cricut.com/help/uploading-patterns-into-design-space )
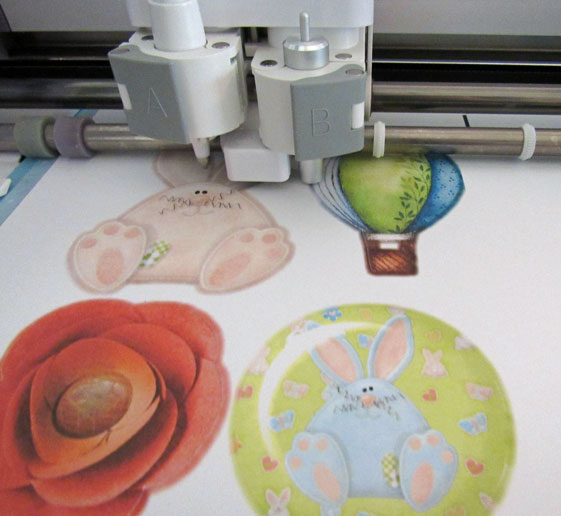
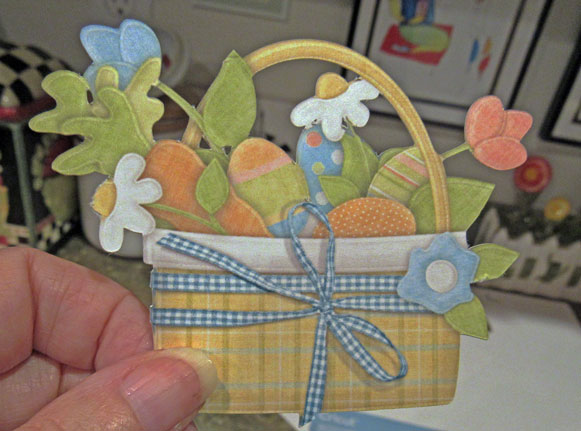
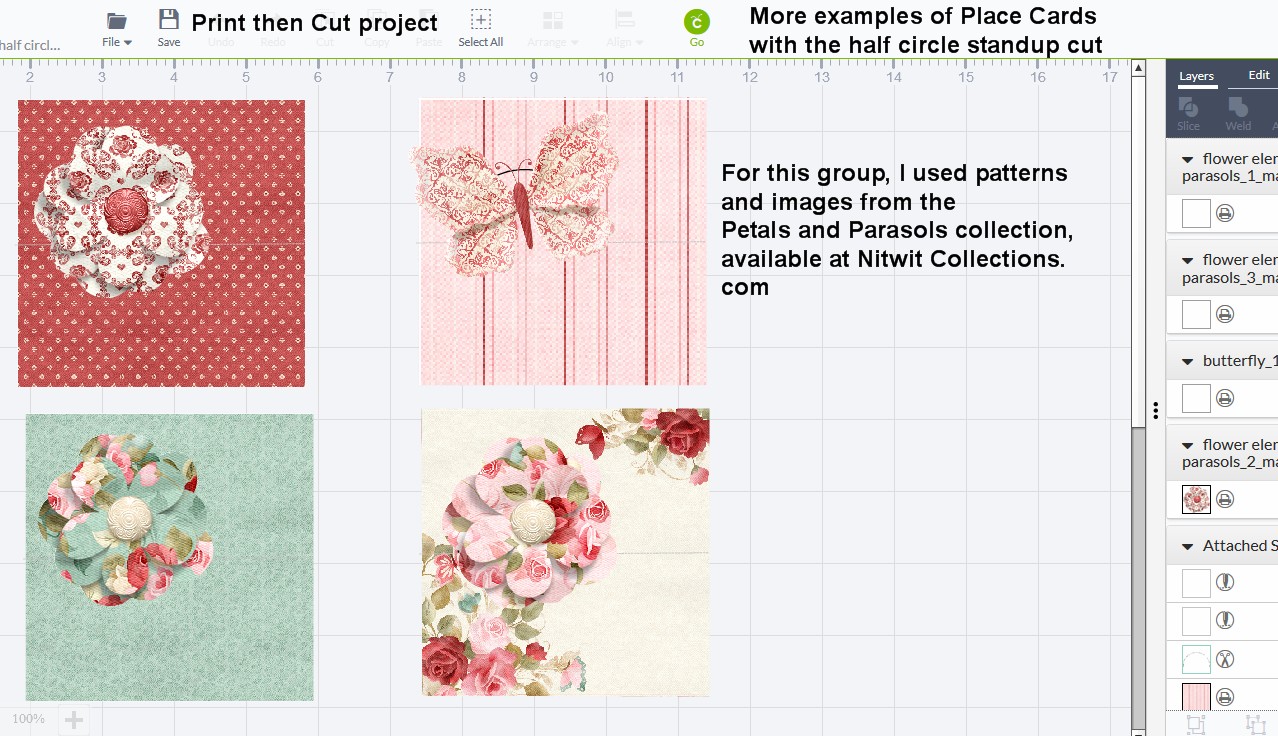
I have also brought in some clipart that I want to use, I usually bring in a variety to choose from,
I place over the half circle area and size. I will print and cut the clipart images and use 3d foam taped pads
to add dimension to the placecard. **Note, for the Hotair balloon, I attached the image and also duplicated
it, so I can add the 3d tape pads to it. I know that the cricut may have a problem with cutting the lines
from the basket to the balloon, so I will piece those each over the image that is printed on the place card
and use the 3d pads on those parts..
I have uploaded previously to Design Space, several digital background papers, using the pattern upload option
Most of these come from Nitwit Collections kits, they contain gorgeous papers that coordinate with the
clipart images in the kits. And I have also uploaded background papers from other Digital Scrapbook
kits that I purchase or get for free from several sources. Kimeric Kreations has wonderful kits that
I have lots of images and backgroundpapers from. **Update 2019, the Kim of KimEric Kreations passed away in 2018 and her
designs are now being sold on : http://www.mymemories.com/store/designers/Kimeric_Kreations
I have also added/attached some text that I have created offline and saved as an image and uploaded to Design Space
At this point I would save this project with a new name to differentiate it from just my single template project. This project still has the
original template, but I want this also to be a new project to preserve the images I have already set up, in case I want to cut more
of the same. So I can still open my original under the name I first named the project, and this project would be under a new name just
for this particular project with these images.
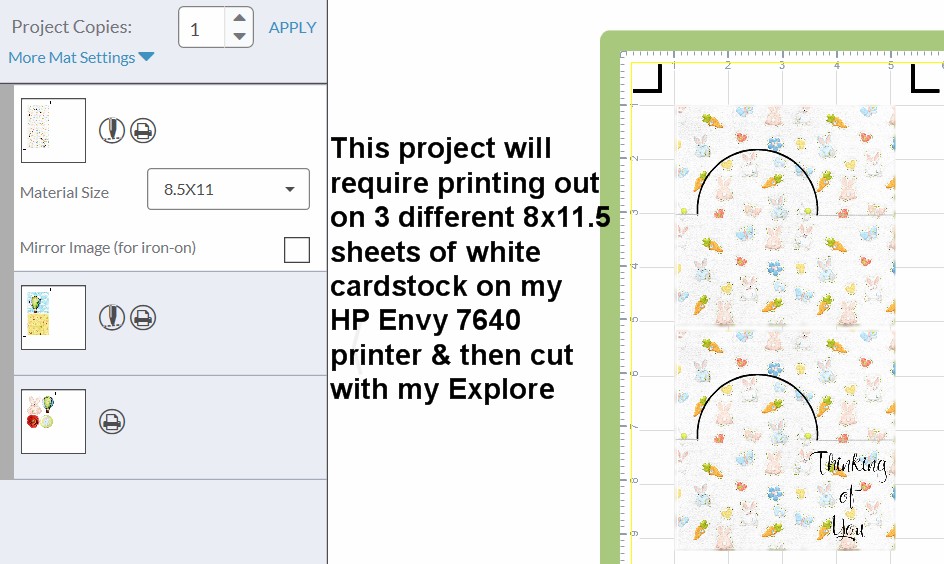
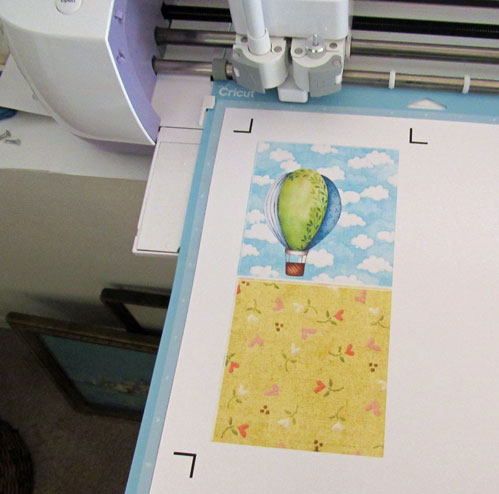
I press GO and I will Print then Cut the place cards - I am using Firefox as my Browser. The printable area allowance is
6x8.5 inches. If I used Google Chrome the printable area allowance is 5.5 x 8. If I owned an iPad or iPhone and
was using the Design Space app, the printable area allowance is 6.5 x 9 inches, (but I don't own an iPad or iPhone)
I print out my print then cut stuff on an HP Envy 7640 printer. I have enrolled in the HP Instant Ink program that this
printer (and other printers as well) qualifies for. I really like the colors and vibrancy of my printed images, that this
printer produces. To find information about the HP Instant Ink program and the printers that qualify see:
HP Instant Ink Overview.
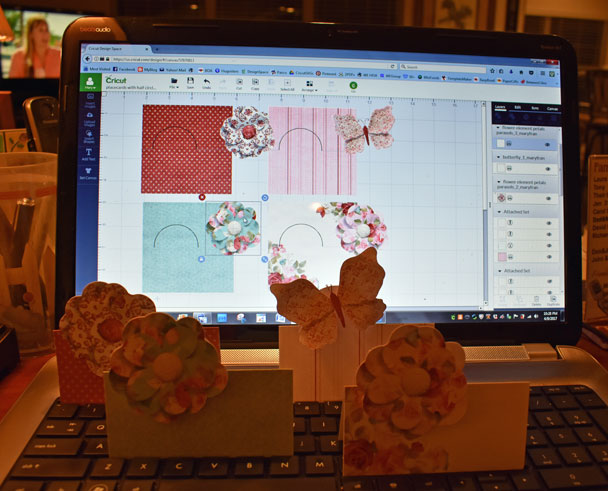
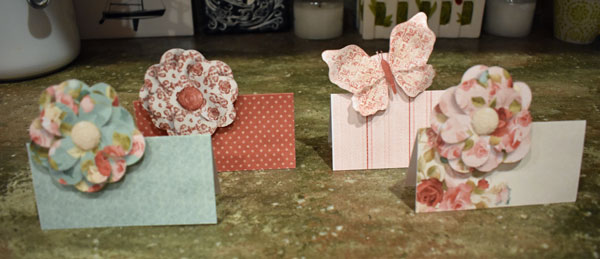
Photos of some of the place cards I completed with the use of the template and some of the print then cut clipart images I used
on them.
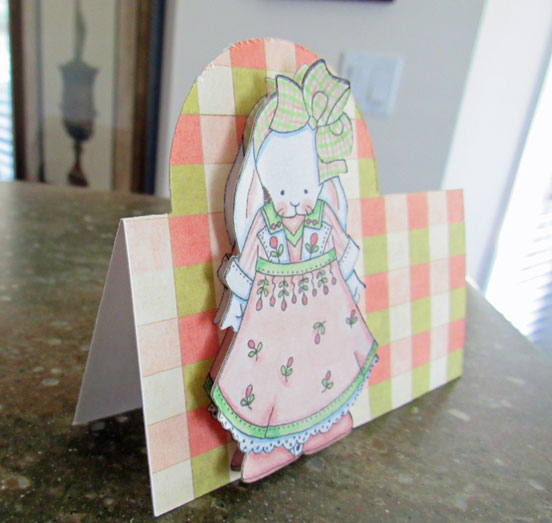
This bunny girl is part of one of my favorite collections that I had previously
purchased from pccrafter. PCCrafter went out of business in 2011. This image
is no longer available for purchase online or anywhere. The artist is
Janie Dawson and for anyone who did purchase clip art sets from the
website, the collection this bunny is from is Bunny Rhymes.
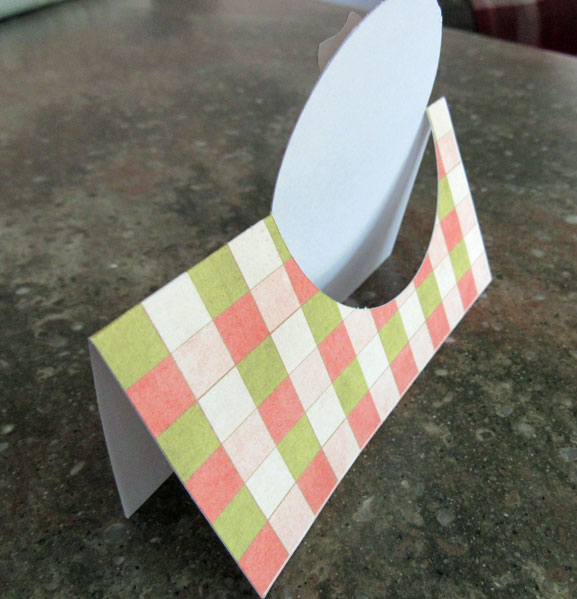
View from behind.
I printed the images out on 110lb white cardstock using my HP Envy 7640 printer.
and will cut using my Cricut Explore (I bought my Explore in Oct 2014)
Cutting the individual clipart images.
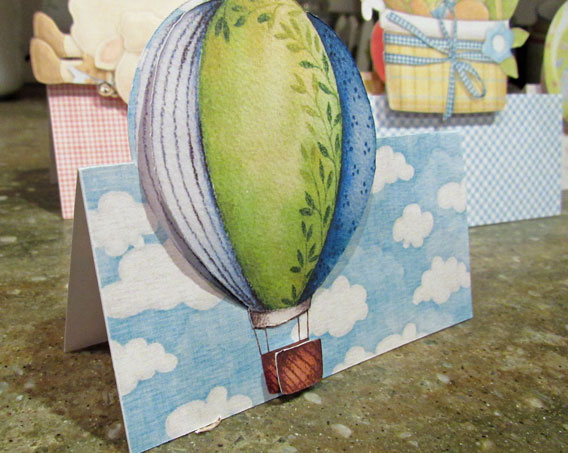
I put glue on bottom of hotair balloon image, and then applied the 3d adhesive
foam pads on the upper portion to give allusion of it being bowed out, and
put a foam pad underneath the basket portion of image. I knew that the Explore
wouldn't do a good job of cutting the very thin lines connecting the basket to
the hot air balloon, so that's why I had put the original image printed directly on
the place card. The hot air balloon is part of the Best Day Ever kit by
Kimeric Kreations available on The Digi Chick. The Background cloud paper that
I used as the pattern fill I believe is from a Nitwit Collections kit.
Another set of printed images being cut by the Explore
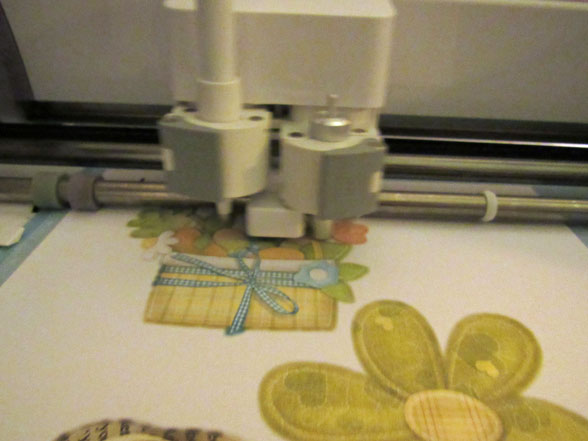
Good job Explore on cutting this basket out - image is from a Nitwit Collections kit
view from the back of place card
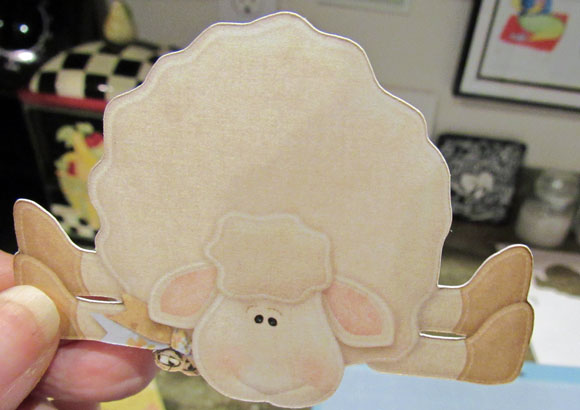
Here's a close up of the Lamb cut with the Explore - this is from a Nitwit Collections
kit > In The Meadow.
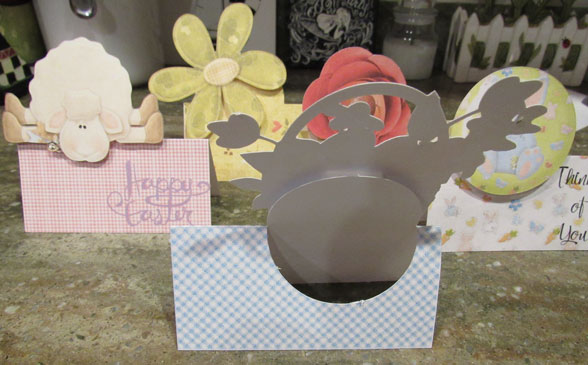
The place card on the far right, I placed 3 half circles together and attached to achieve
the 3 cuts, and on that image I applied a 3d image that is in a kit by Anna Griffin
that I bought on HSN. The plain blue stripe placecard, was cut from 6x6 inch piece of
scrapbook paper. The Happy Easter on the one card with the Lamb (lamb/sheep is from a
Nitwit Collections kit "In the Meadow"
and some of the other images are from other Nitwit Collections) is from Design Space, I just flattened and set it to Print.
The bunny girl in the forefront, is from a former pccrafter clipart kit, (Bunny Rhymes by Janie Dawson), pccrafter closed
in 2011, and this particular image and most pccrafter kits are no longer available online for sale.
I personally own about 250 clipart kits from pccrafter, and love using them in Print then Cut projects.
One of the most popular artists from pccrafter is Laurie Furnell, she has her own Etsy shop and
sells some of her "classic" former pccrafter kits, as well as her new art kits. check out her
shop at > https://www.etsy.com/shop/lauriefurnelldesigns
I also like clipart from artists at Daisie Company (check out artist Shelly Comiskey's collections on Daisie, and the
the delightful art of the owner of Daisie - Gina Jane, both Gina Jane and Shelly, were former pccrafter artists)
and love, love, love, Nitwit Collections , another former pccrafter artists web store >> Tammy DeYoung's Etsy Store, and
Audrey Jeanne Roberts beautiful watercolor sets on Etsy.
Audrey Jeanne is a former artist at Daisie Company and now only sells on Etsy.
At one time PCCrafter, Daisie Co. and Aimee Asher (PCCrafter & Aimee Asher are no longer in business) had several artists contributing wonderful clipart collections.
But due to the rampant issue of illegal file sharing and disregard of terms of use, and copyright infringement,
most of those artists decided it is no longer in their best interest to offer clipart sets for sale in downloadable form.
I cherish all of the amazing images I have amassed over the past 20 years that live comfortably on my harddrives.
and that I have made sure to keep backed up!!
I have so many wonderful collections from amazing artists, and have really enjoyed exploring new uses
of the clipart images using the Print then Cut feature of Design Space. *See an updated youtube video published
after an Update to Design Space on Jan 8th 2019 >>
How to Use Print Then Cut in Cricut Design Space with Uploaded Image - Start to Finish
https://www.youtube.com/watch?v=R5a4M6AbstA
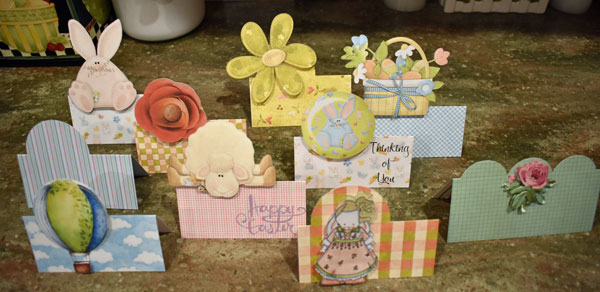
Here are a few more screen shots of other place cards I made following the above steps
After printing and cutting, I assemble the clipart images on top of the place cards. Each of these are prototypes, just for my own
creations. If I want to use as place settings, I would add names to them.
While I have used Microsoft Digital Image software, to create the half circle image,
I imagine that other photo/graphic editing programs should be able to accomplish the same image.
I know that in Adobe Photoshop Elements, I can add a stroke around an image and I can make the stroke any pixel width I want.
So if I was to use PSE,
I would add a circle shape in one color to a new transparent canvas, and then add a stroke edge in 1 pixel width in a different color than the circle.
And then using the magic wand tool in PSE, I would select the color circle insides, and delete it, and I would be left with the 1 pixel width circle, and I would crop that
circle in half, and then name and save the half circle in PNG transparent format. And upload it to Design Space, and save as a CUT image.
FYI, a score line can always be changed to a "Cut" line, by selecting it in the layers panel and changing it to a "Cut" line.
I have used this option to make slits in shapes or on images, (And you always Attach cut lines or scorelines to projects - do NOT Flatten
a scoreline or a cut line. ) such as teacup clipart that I might want to place a teabag inside, I've found it a useful option on several projects.
Anything you want to use as as a cut line shouldn't be wider than 1 pixel or the Explore will just cut around the lines
and not make a slice or slit on the material it is cutting.
If you would like the half circle cut image I made, you may download it and save to your own computer
and upload to Design Space
link to >> Half Circle line image
Note: I Do Not use the popular free program of INKSCAPE that others use to create with and save their images in SVG format etc.
So I am not familiar with its features or capabilities.
My other webpages I have made showing my experience with the Print then Cut feature of Design Space with my Cricut Explore
http://sippingtea.com/tuts/cricutexploreprintncut.html
http://sippingtea.com/tuts/cricutexploreprintncut2.html
http://sippingtea.com/tuts/cricutexploreprintncut3.html
Printing and cutting images /elements from a digital scrapbook kit
http://sippingtea.com/tuts/printncutdigielements.html
How I make some of my cards, and extract an image from a background
http://sippingtea.com/tuts/cardscutwithcricutexplore.html
My online Photo Albums of projects done with my Explore
Print then Cut and Cut only projects done with my Explore (and my HP printers)
https://www.flickr.com/gp/24663470@N06/04ePHG
Cards album
https://www.flickr.com/gp/24663470@N06/B7W193
Turkey table favor boxes
Santa Village favor boxes
https://www.flickr.com/gp/24663470@N06/ko06H8
Sunflower picture project
https://www.flickr.com/gp/24663470@N06/C4un56
Print the Cut woodland animal magnets
Paper Dolls
https://www.flickr.com/gp/24663470@N06/04ePHG
Cookie Bag favor Project
Gatefold cards
https://www.flickr.com/gp/24663470@N06/A3pw89
https://www.flickr.com/gp/24663470@N06/s6f2w8
Teaparty invitation prototype
https://www.flickr.com/gp/24663470@N06/400n0t
https://www.flickr.com/gp/24663470@N06/906064
Candy Cane Wrappers
https://www.flickr.com/gp/24663470@N06/3Fn50t
Large label stickers
https://www.flickr.com/gp/24663470@N06/qr3vK6
Jogging Humor magnet
© Mary N. all photos, screen shots are mine, please do not copy or share.
I have no Affiliation to Cricut, HP Printers, or any of the artists
(but, I do consider myself a friend to many of the artists)
and websites I have mentioned in this webpage.
To Top of Page